Tools
Tools are a feature in IDEAS that allows you to process data into results for analysis. IDEAS offers many Inscopix tools for different analysis use cases such as calcium and behavior processing. Although these tools cover many analysis use cases, often times there are custom use cases for analysis, specific to a particular lab, experimental setup, data modality, etc. Enter custom tools analysis, a rich set of features in IDEAS that allow you to seamlessly take your custom analysis code and package it as a tool that can be used in projects on IDEAS.
Inscopix Tools
Inscopix tools are tools developed, tested, and published by Inscopix. These tools are publicly available for anyone on IDEAS to use in their projects.
Many of these tools are also open-source, and can be copied for customizations, refer to this guide for more information.
Tools Library
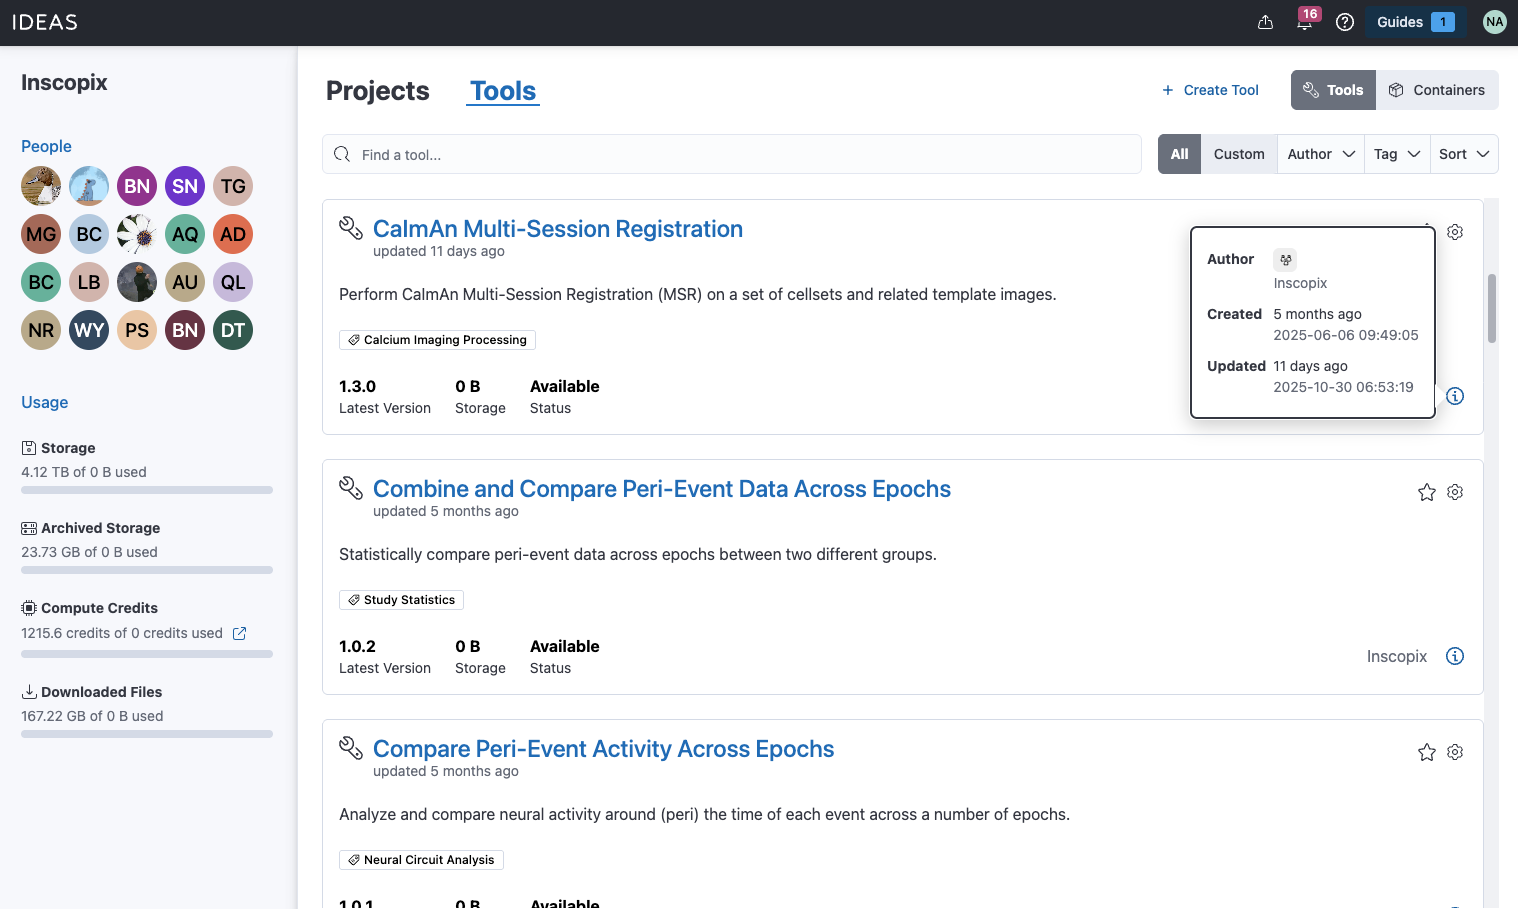
The tools library is a place to explore and discover tools in IDEAS.
Where can I access the tools library?
Go to your organization dashboard and select the tools tab.
On this page you can see your custom tools and those created by others within your organization, as well as public, Inscopix tools. Tools can be filtered by keywords, tags, and author. There is also a filter to only show custom tools within your organization. Tools can also be sorted by criteria like date created, and can be pinned, similar to the project dashboard. Selecting one of the tools will navigate you to a project page for the tool.
From the tools library, the containers library is also accessible, where you can browse public and custom containers on IDEAS. Learn more about containers here.
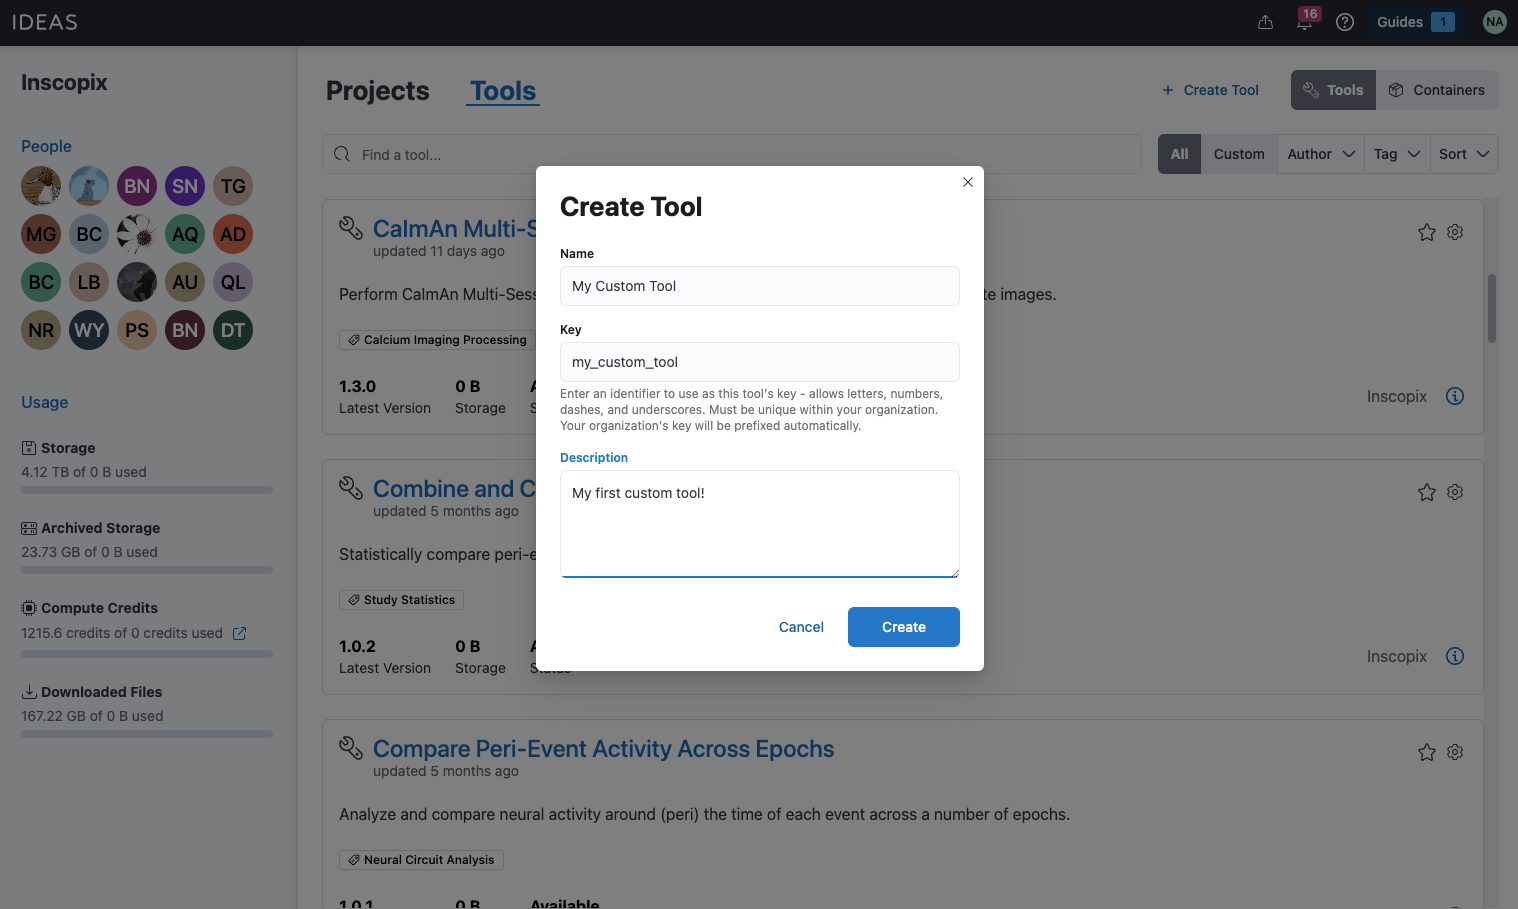
Create Tool
New custom tools can be created by selecting the create tool button in the top-right corner of the tool library. This will open up a panel, prompting you to enter some preliminary information about the new tool, including a name, and short description. Both of these properties can be changed after the tool is created by editing the tool settings.
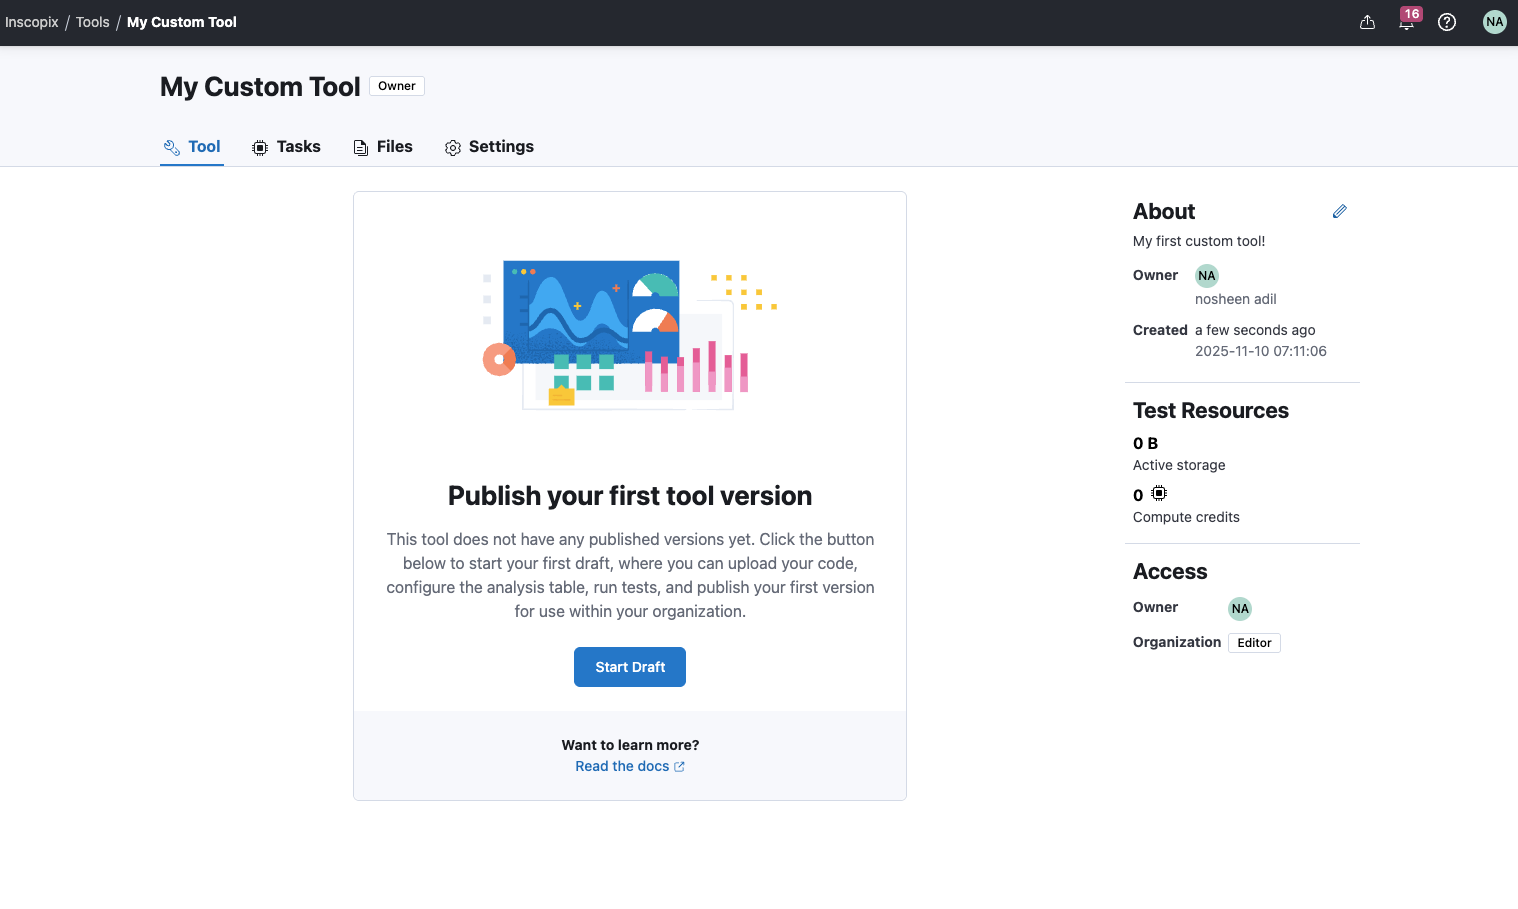
Tool Projects
Each tool in IDEAS has its own project page. This page is similar to regular project pages, but is specific to a tool. When you create a new custom tool, you’ll be navigated to the initial project page for the tool. This page will prompt you to publish the first version of your tool. Selecting the start draft button will navigate you to the tool publisher interface. Read more about the process of publishing tool versions here.
Version Table
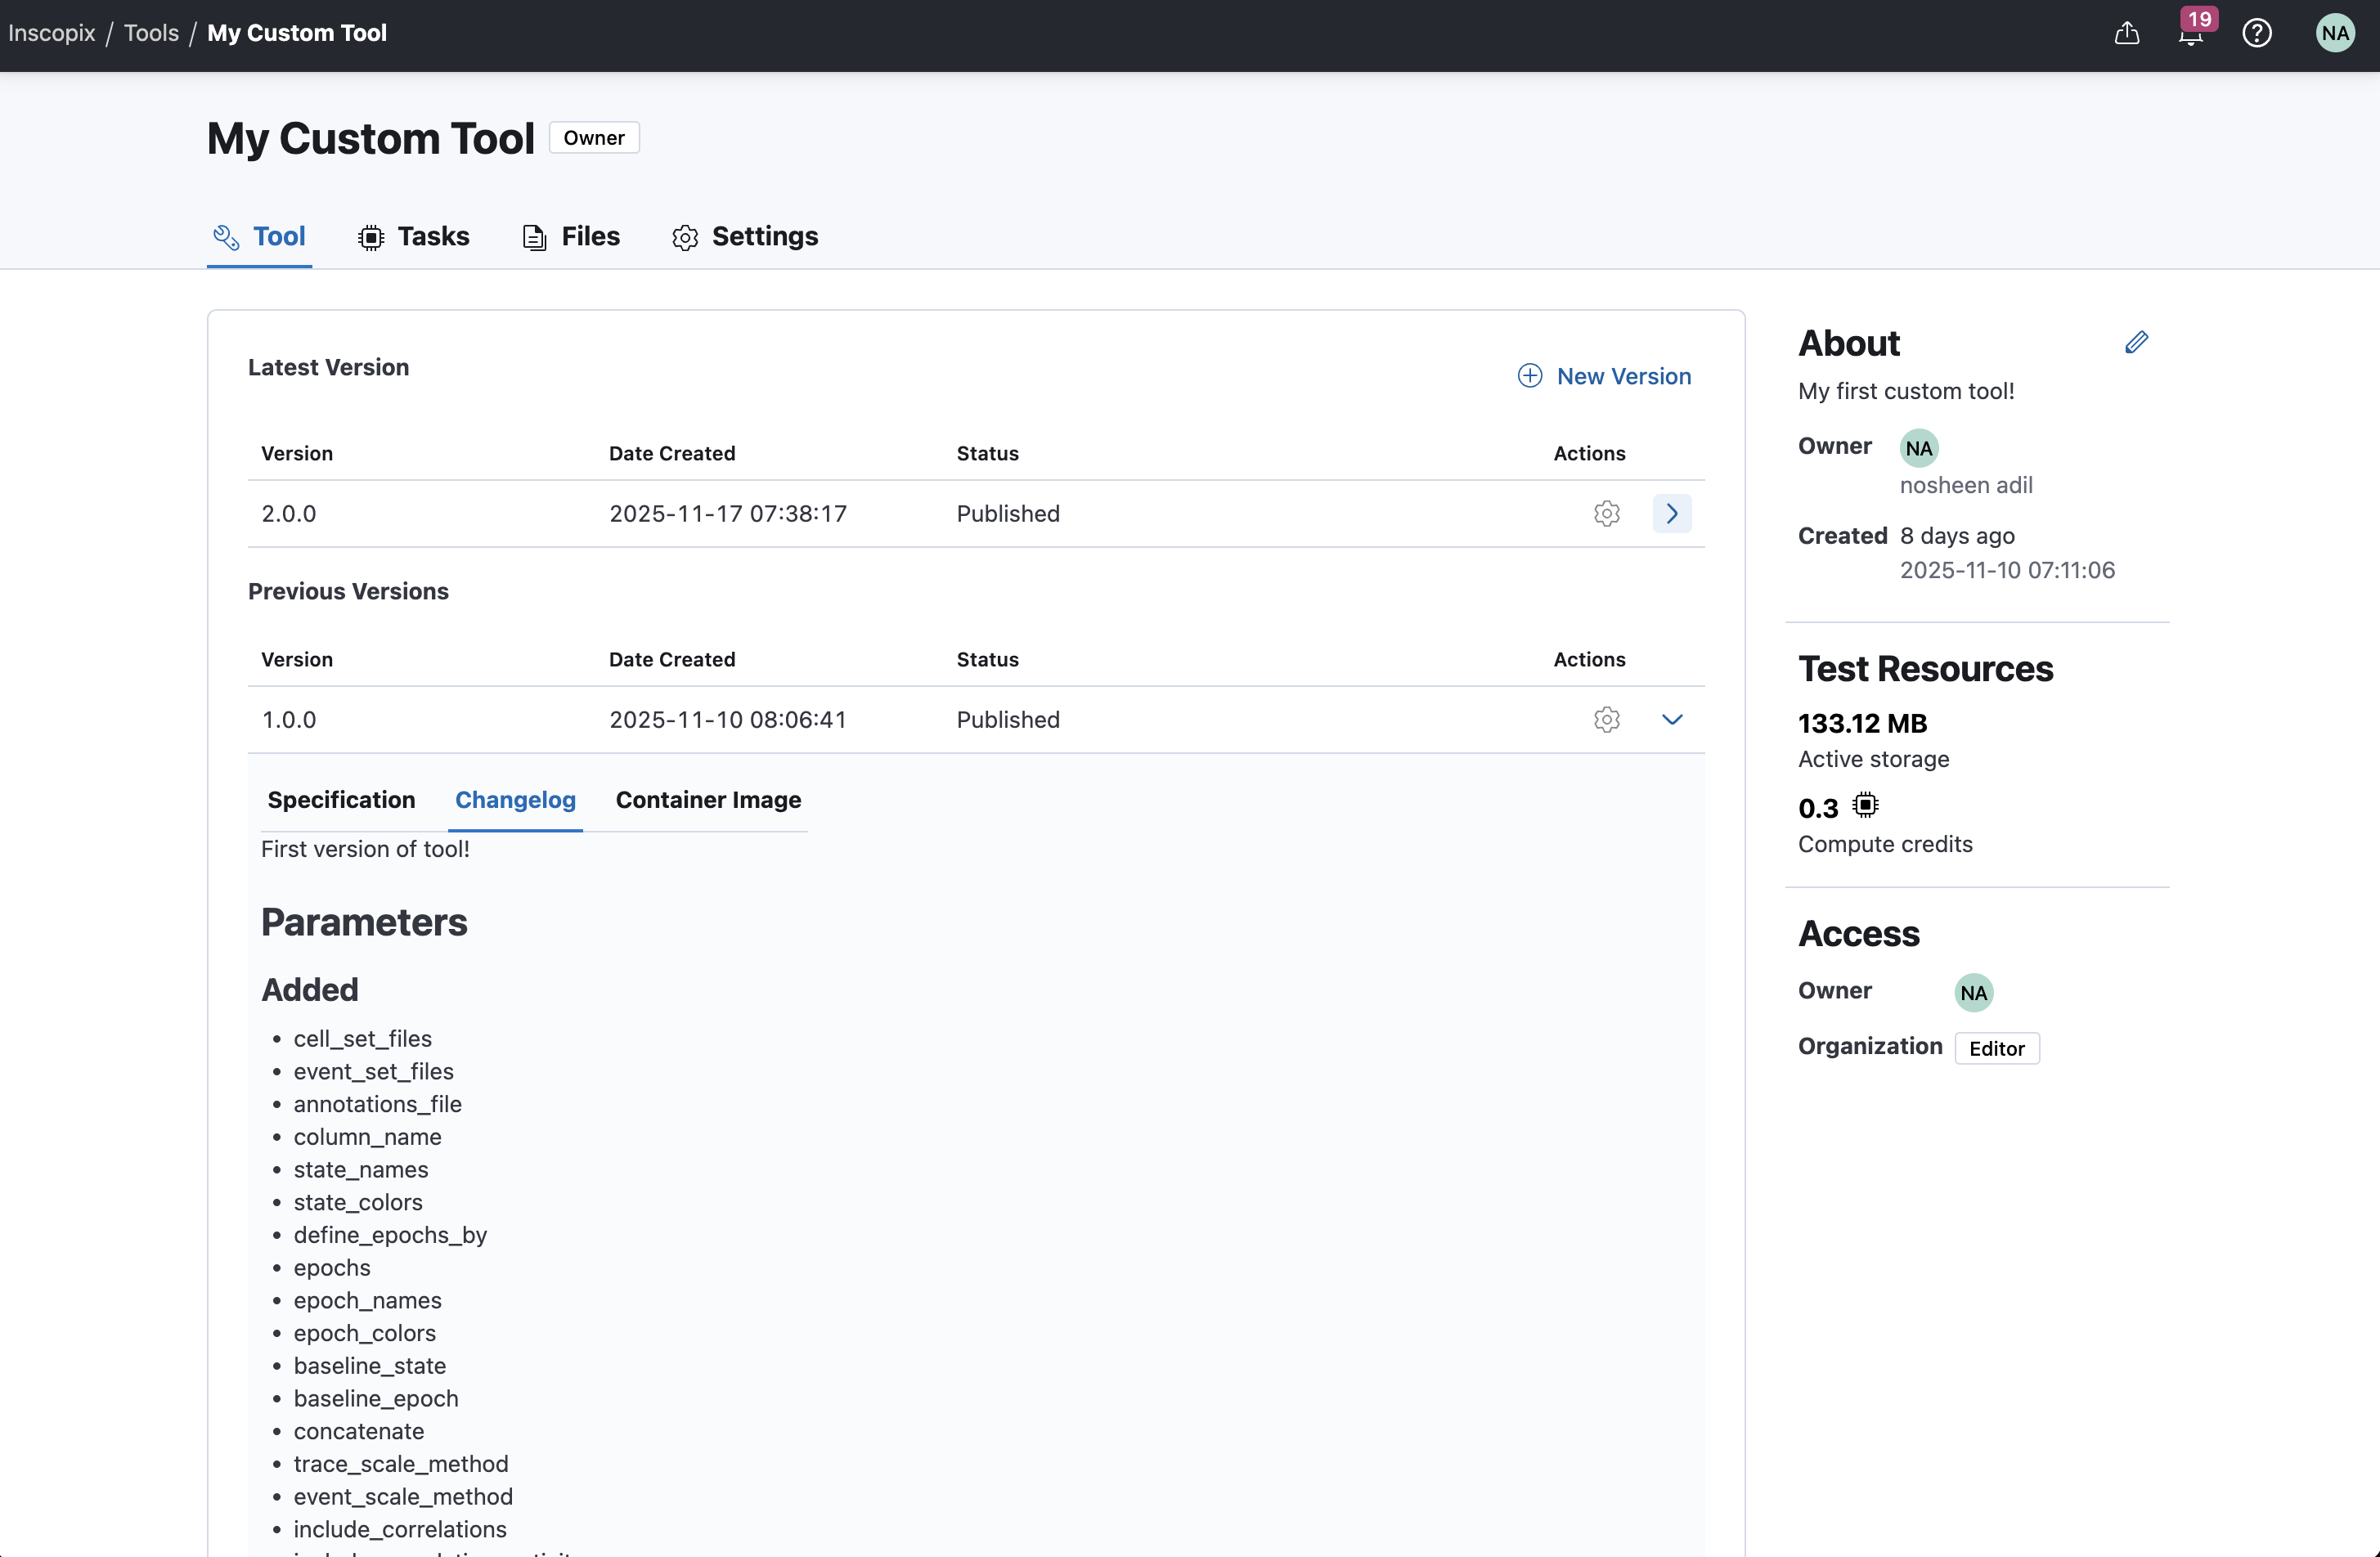
Once the first tool version has been published, the tool project page will show information about the latest and previous published tool versions. Selecting the New Version button will open the tool publisher for a new draft version of the tool.
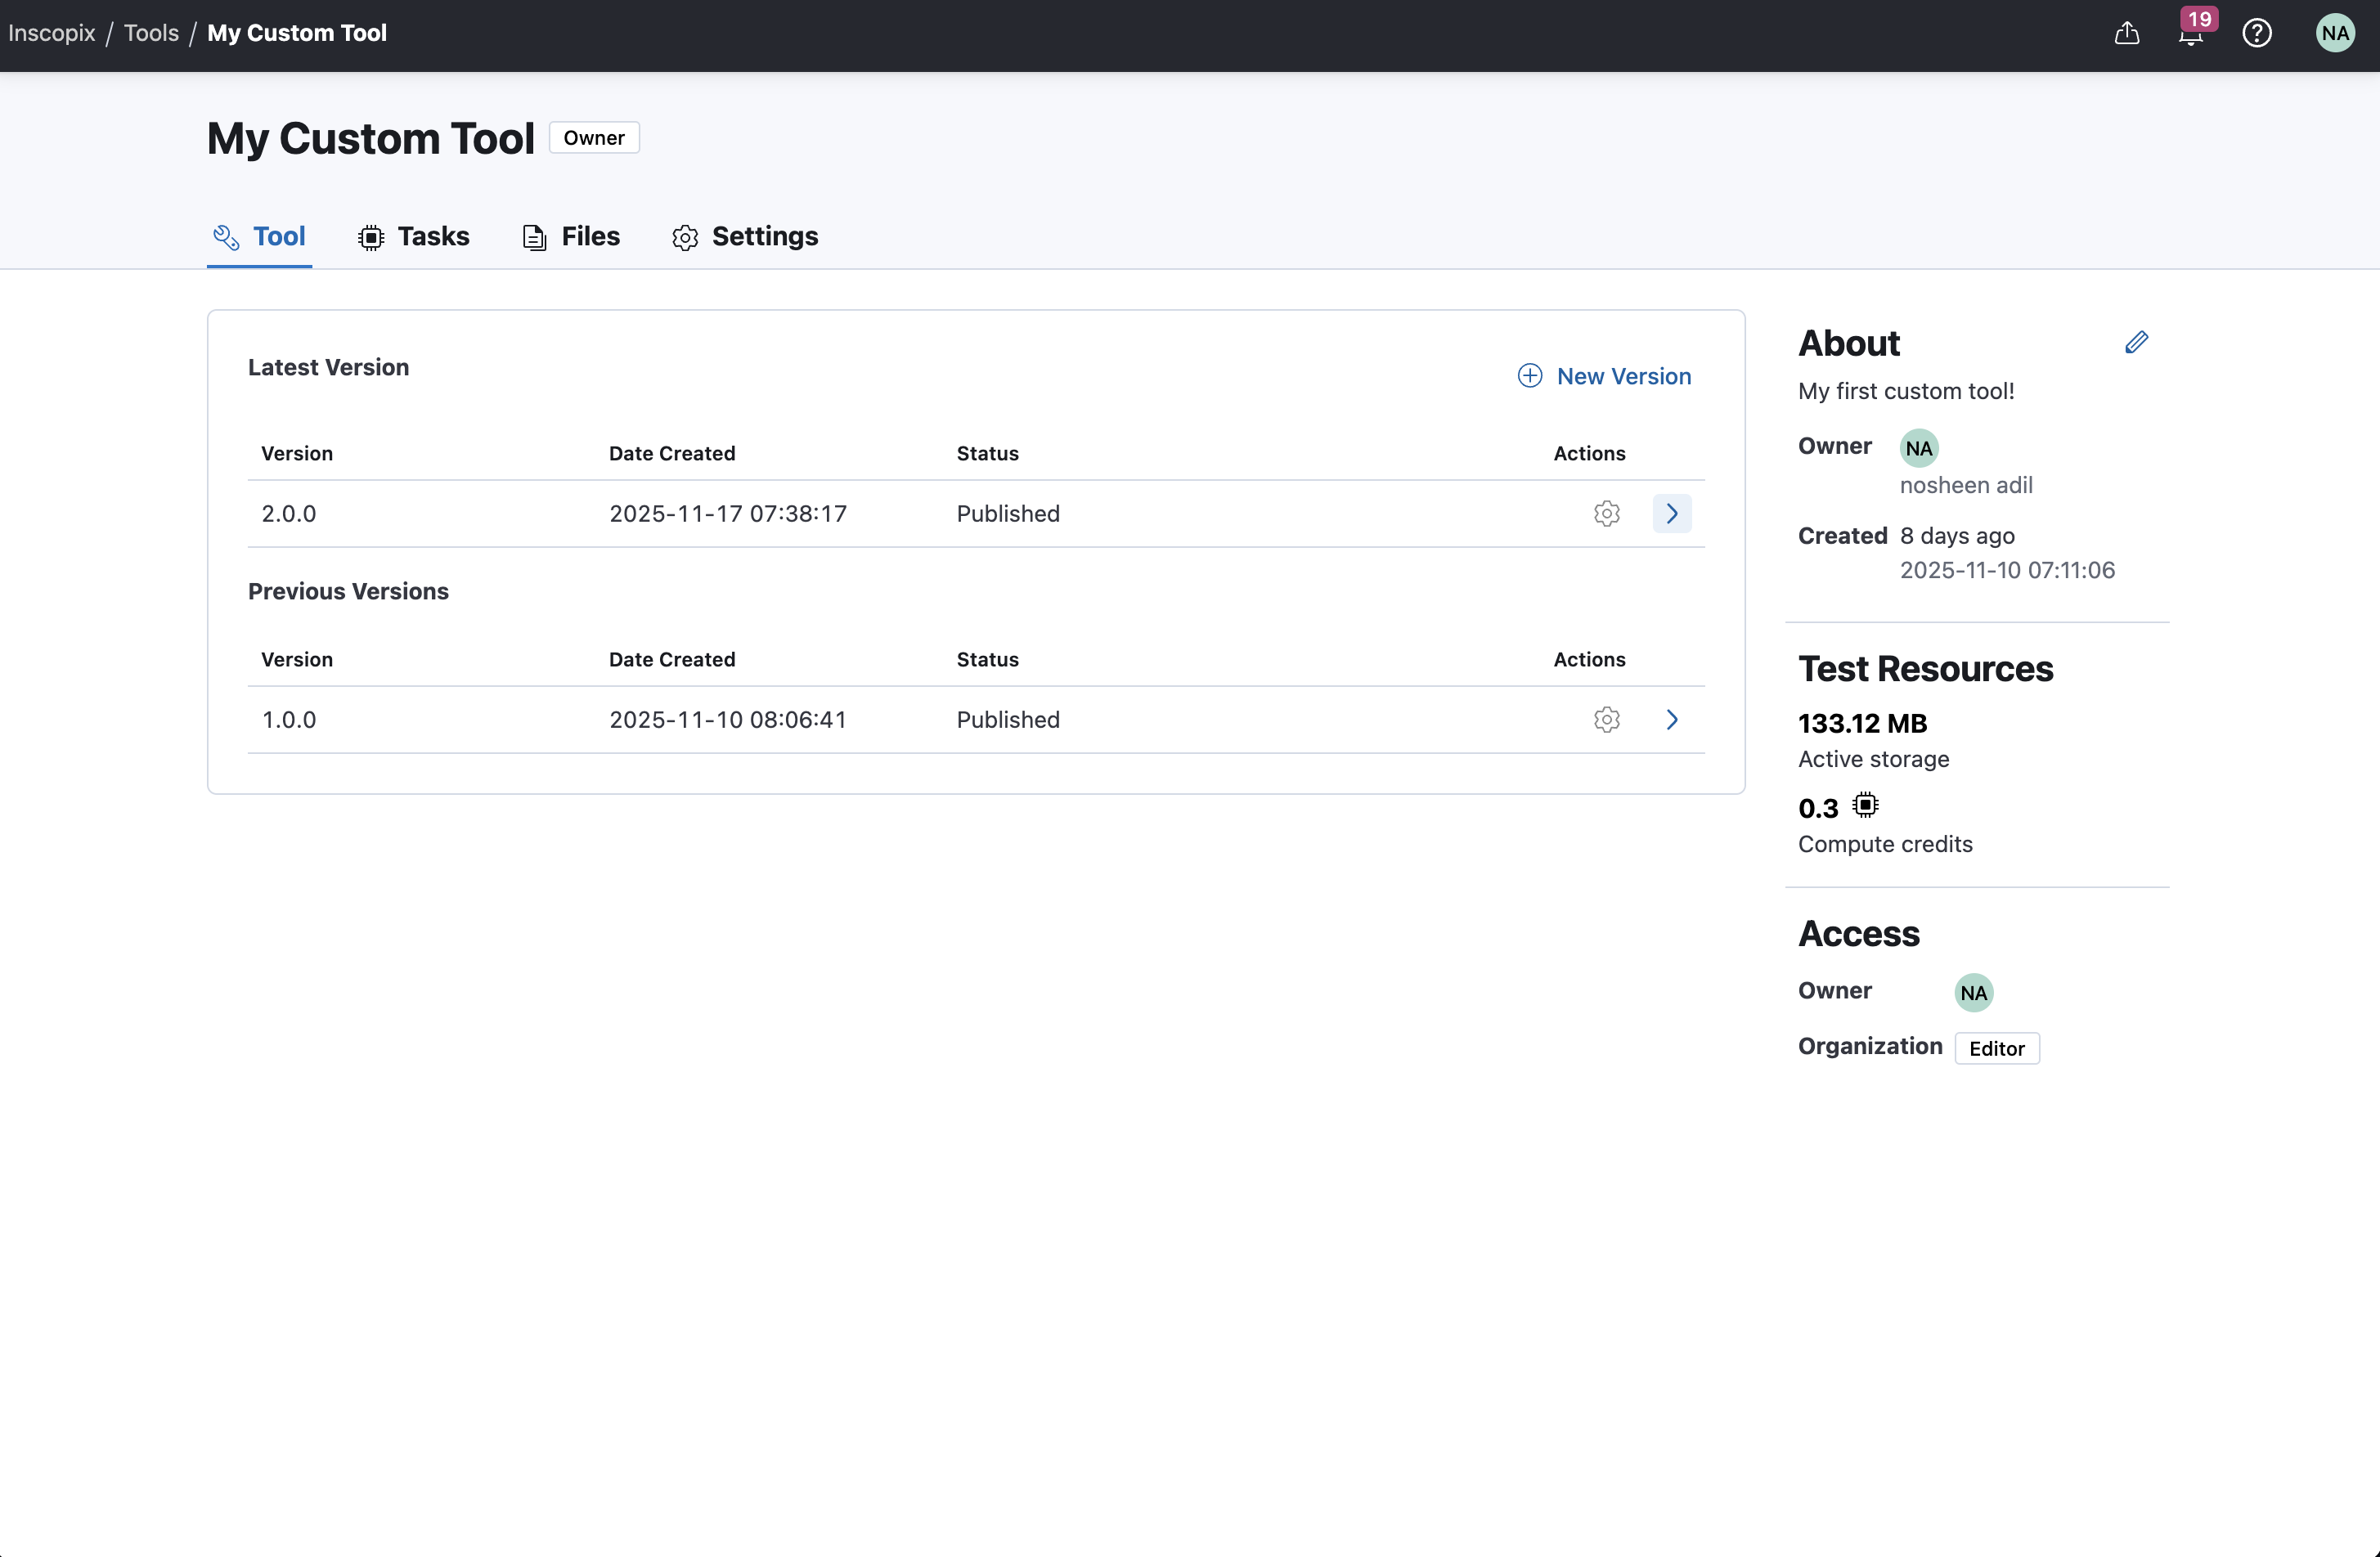
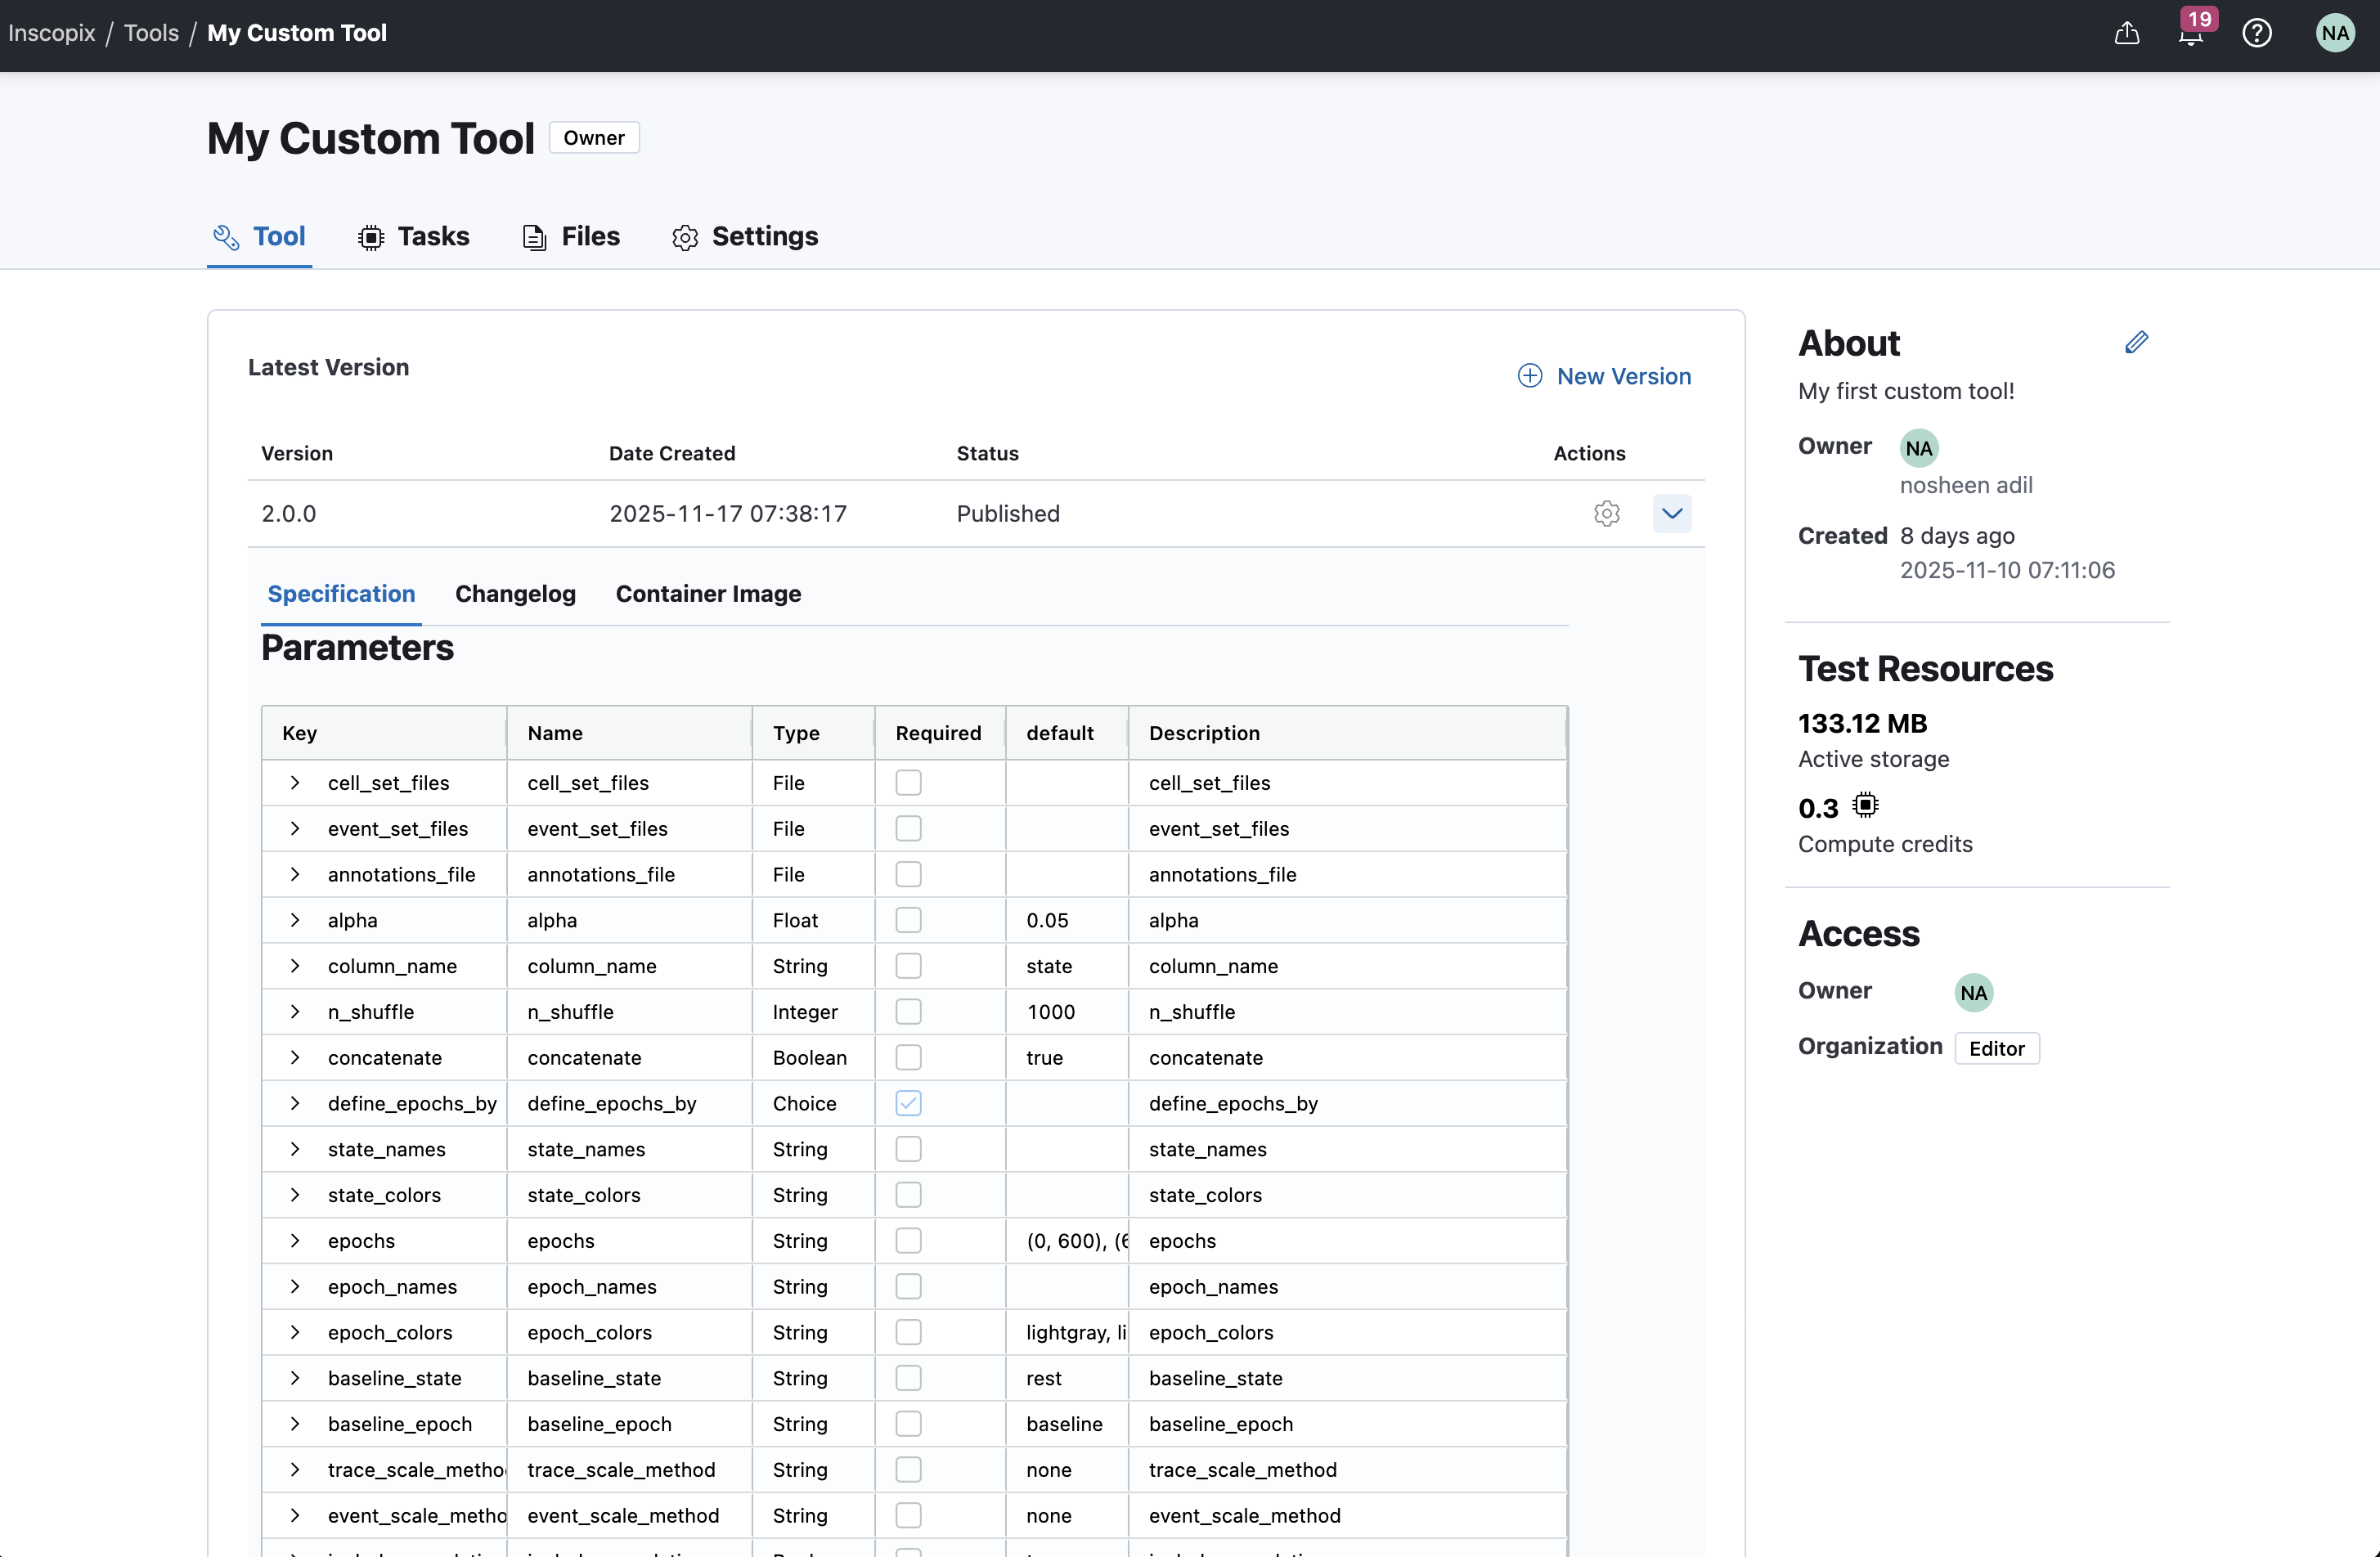
Each row in the version table can be expanded, showing the specification of the tool version, consisting of the tool parameters, outputs, and default resources.
Additionally, you can view a changelog of the version, describing what changed about the tool in the particular version.
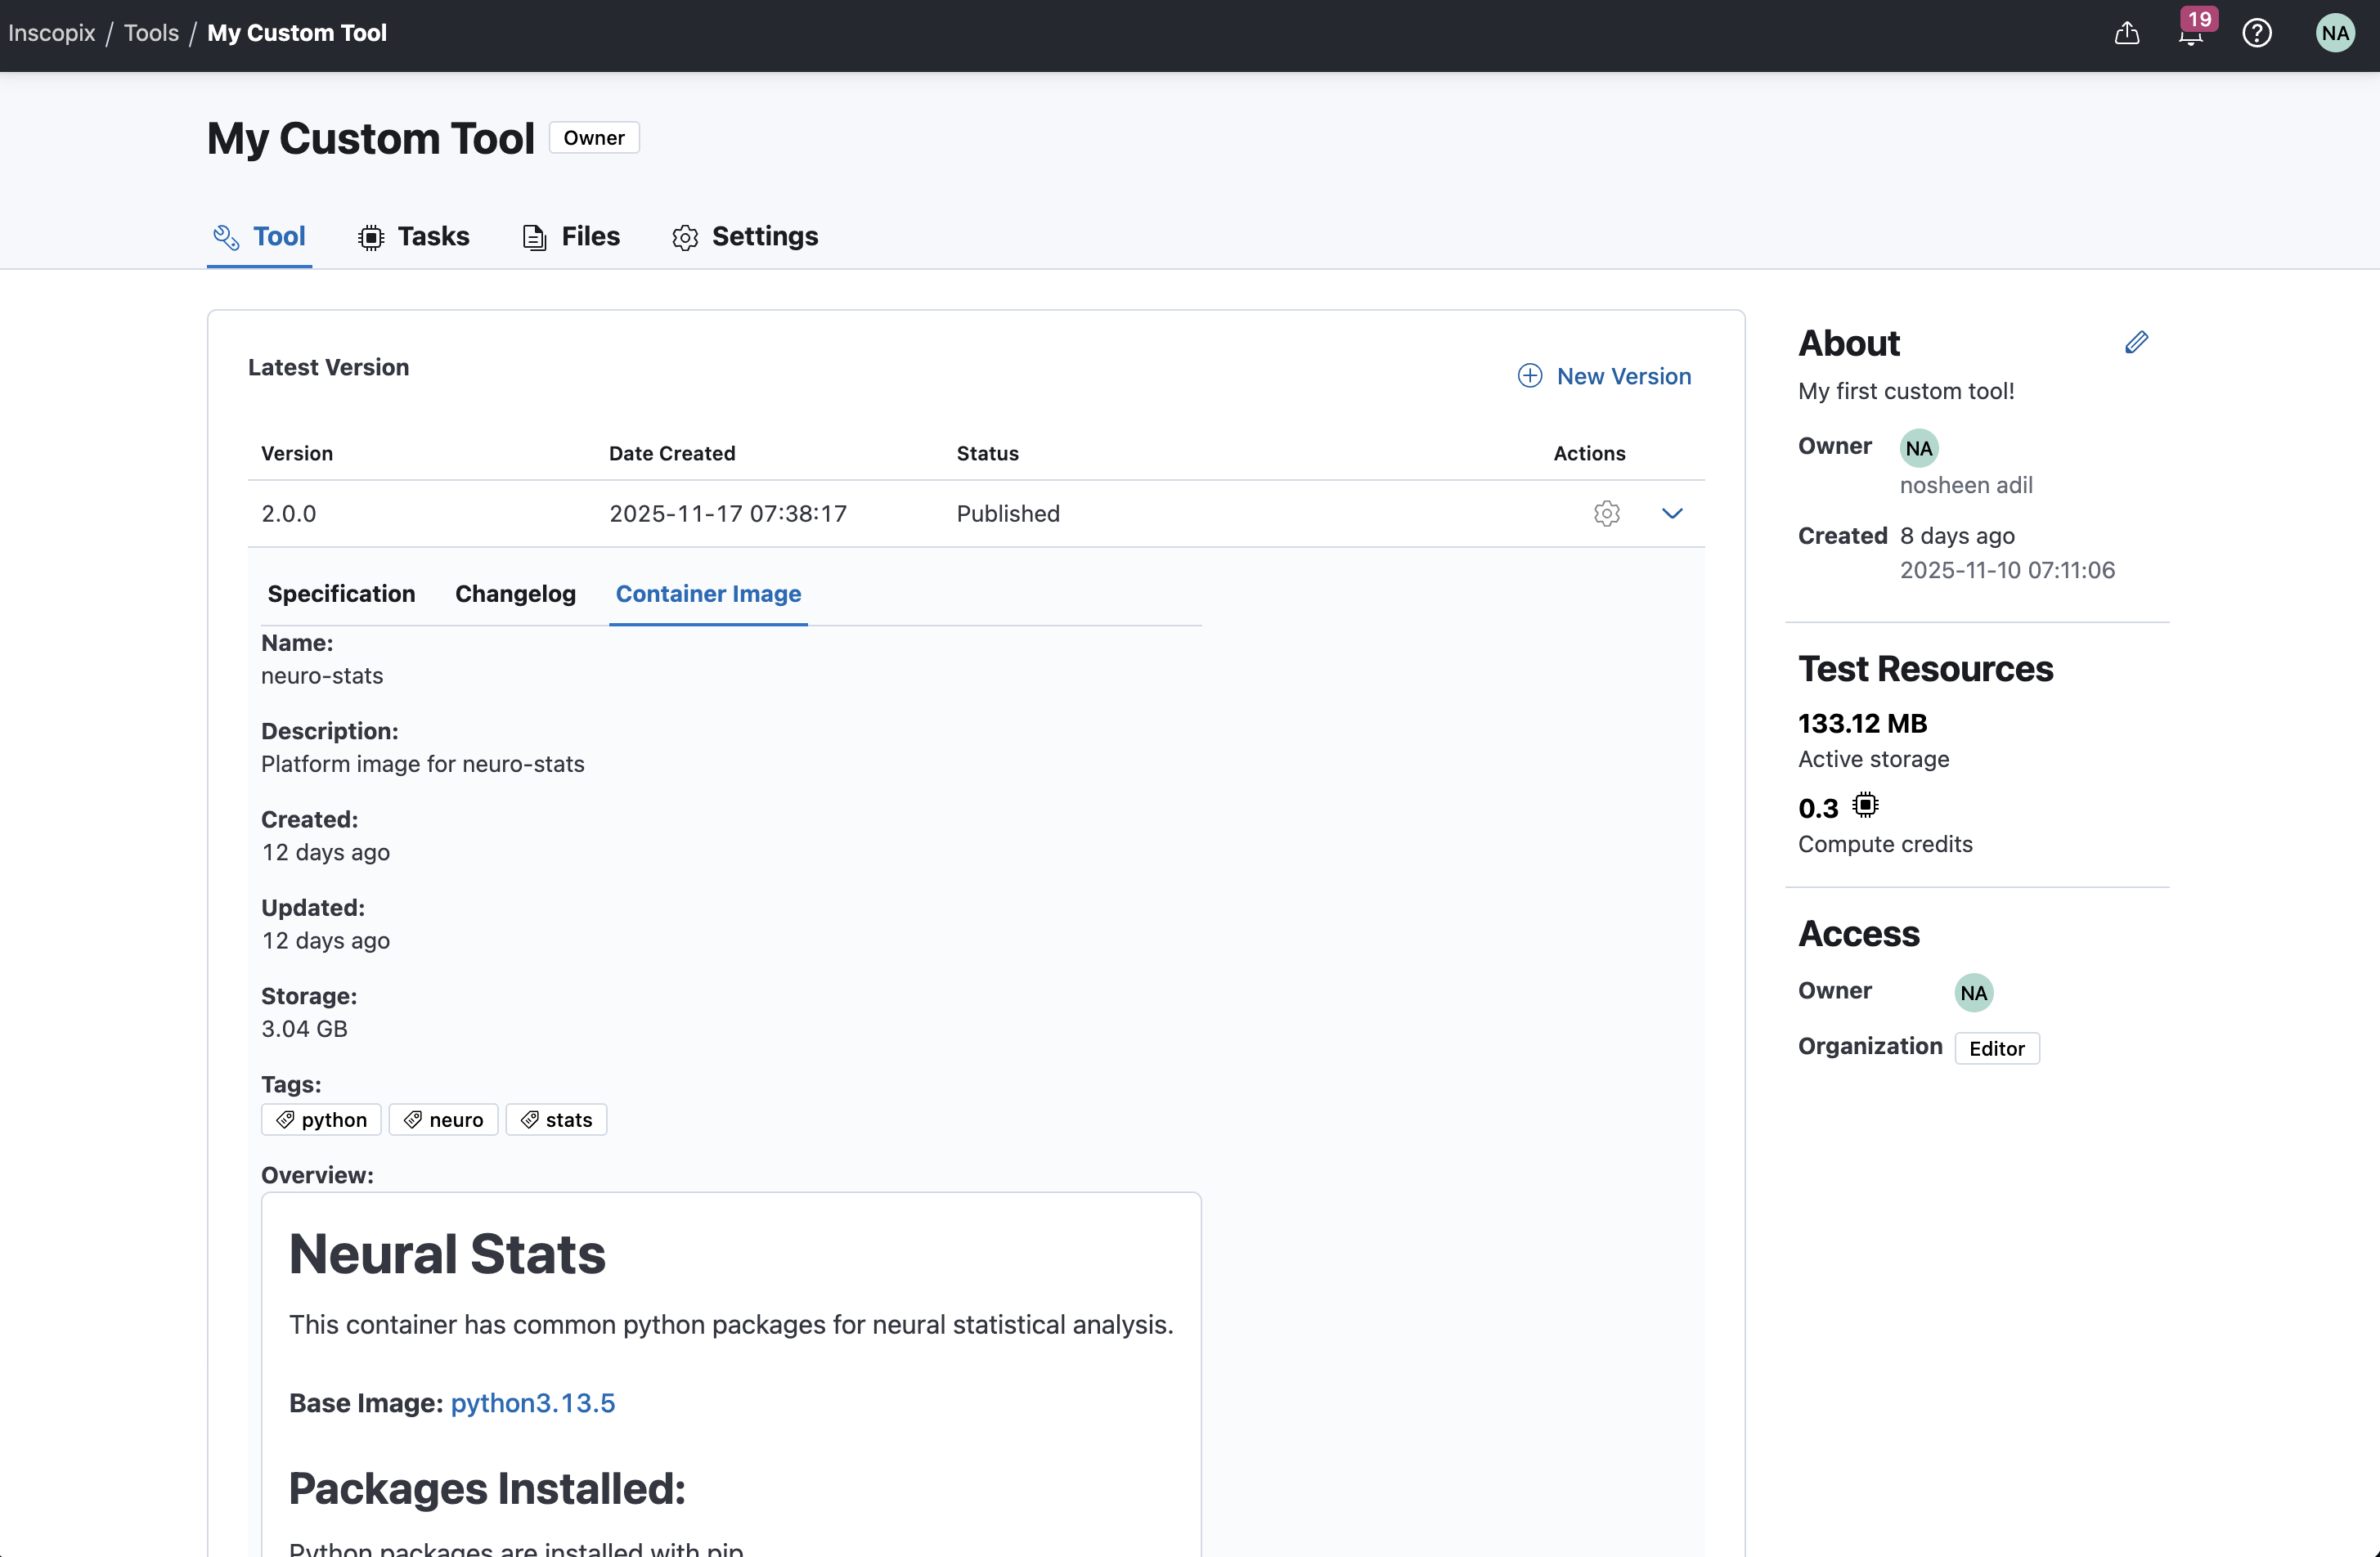
Also, you can view information about the specific container image used for the tool version.
Tasks
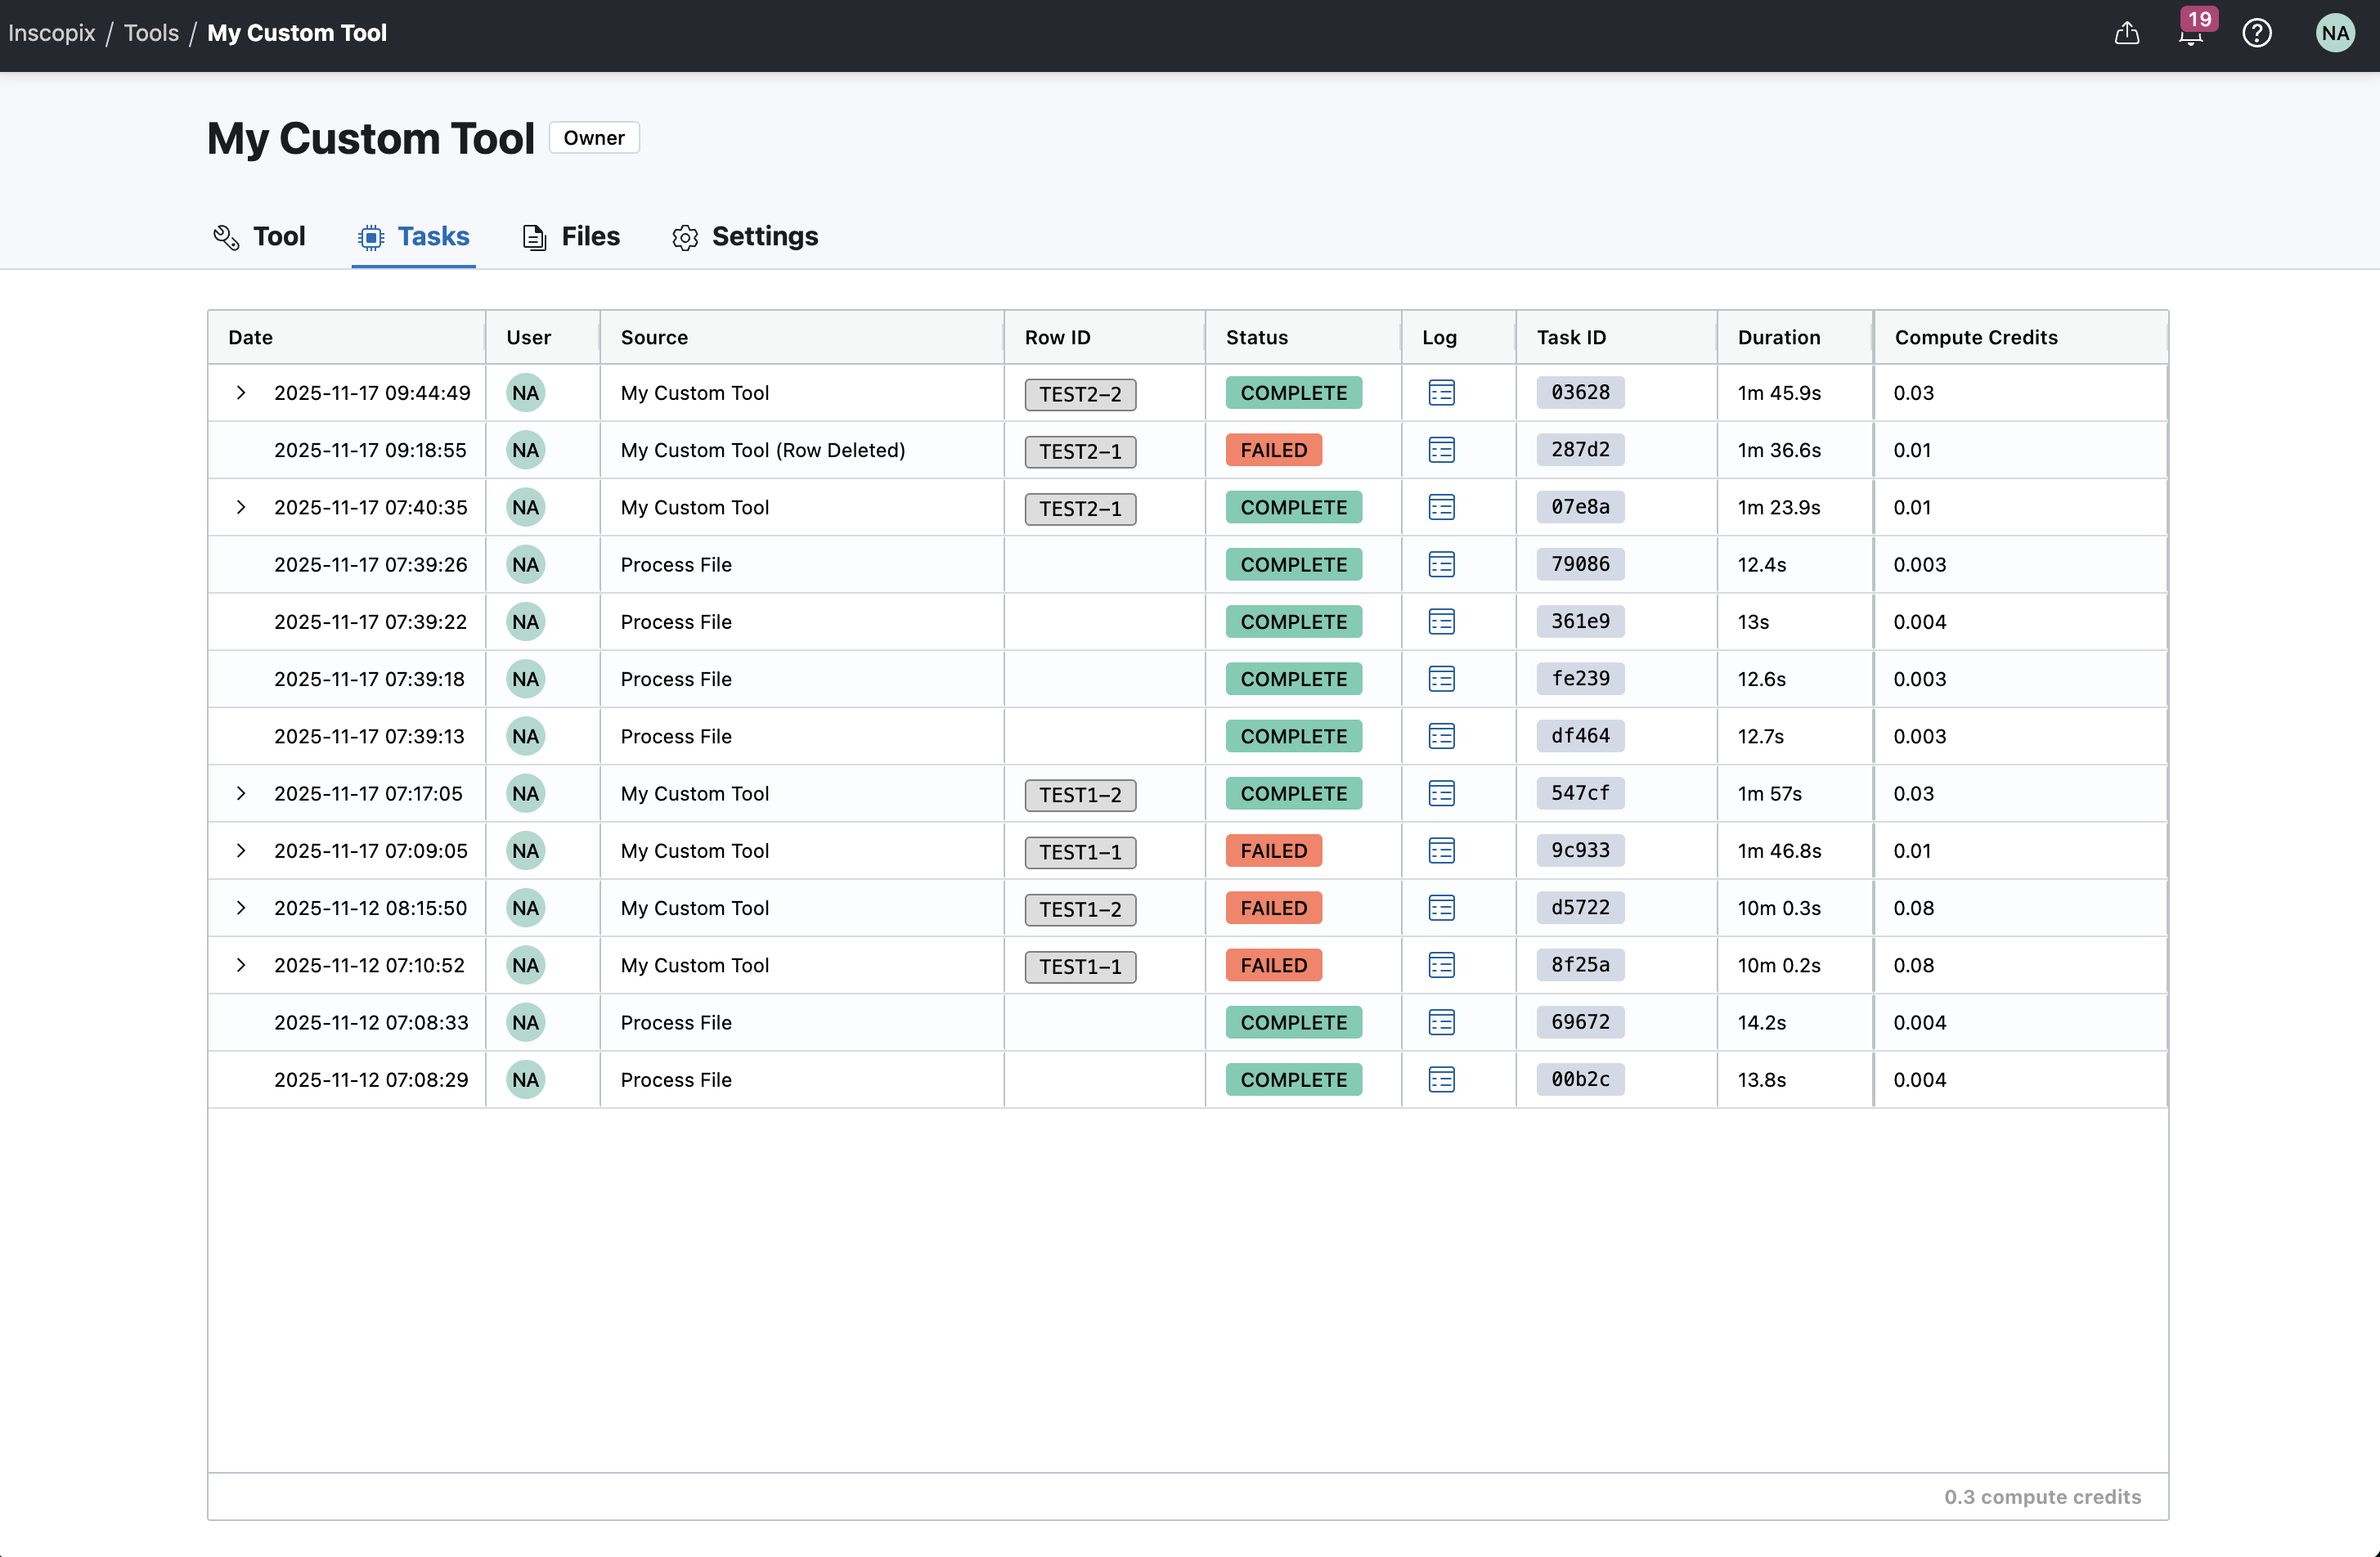
Tasks executed in the tool publisher test step will appear in the tasks tab of the tool project. This tab will show statistics about tasks executed in this project for testing the tool, including the amount of compute credits consumed (learn more about quota usage here), the duration, the status, and any logs.
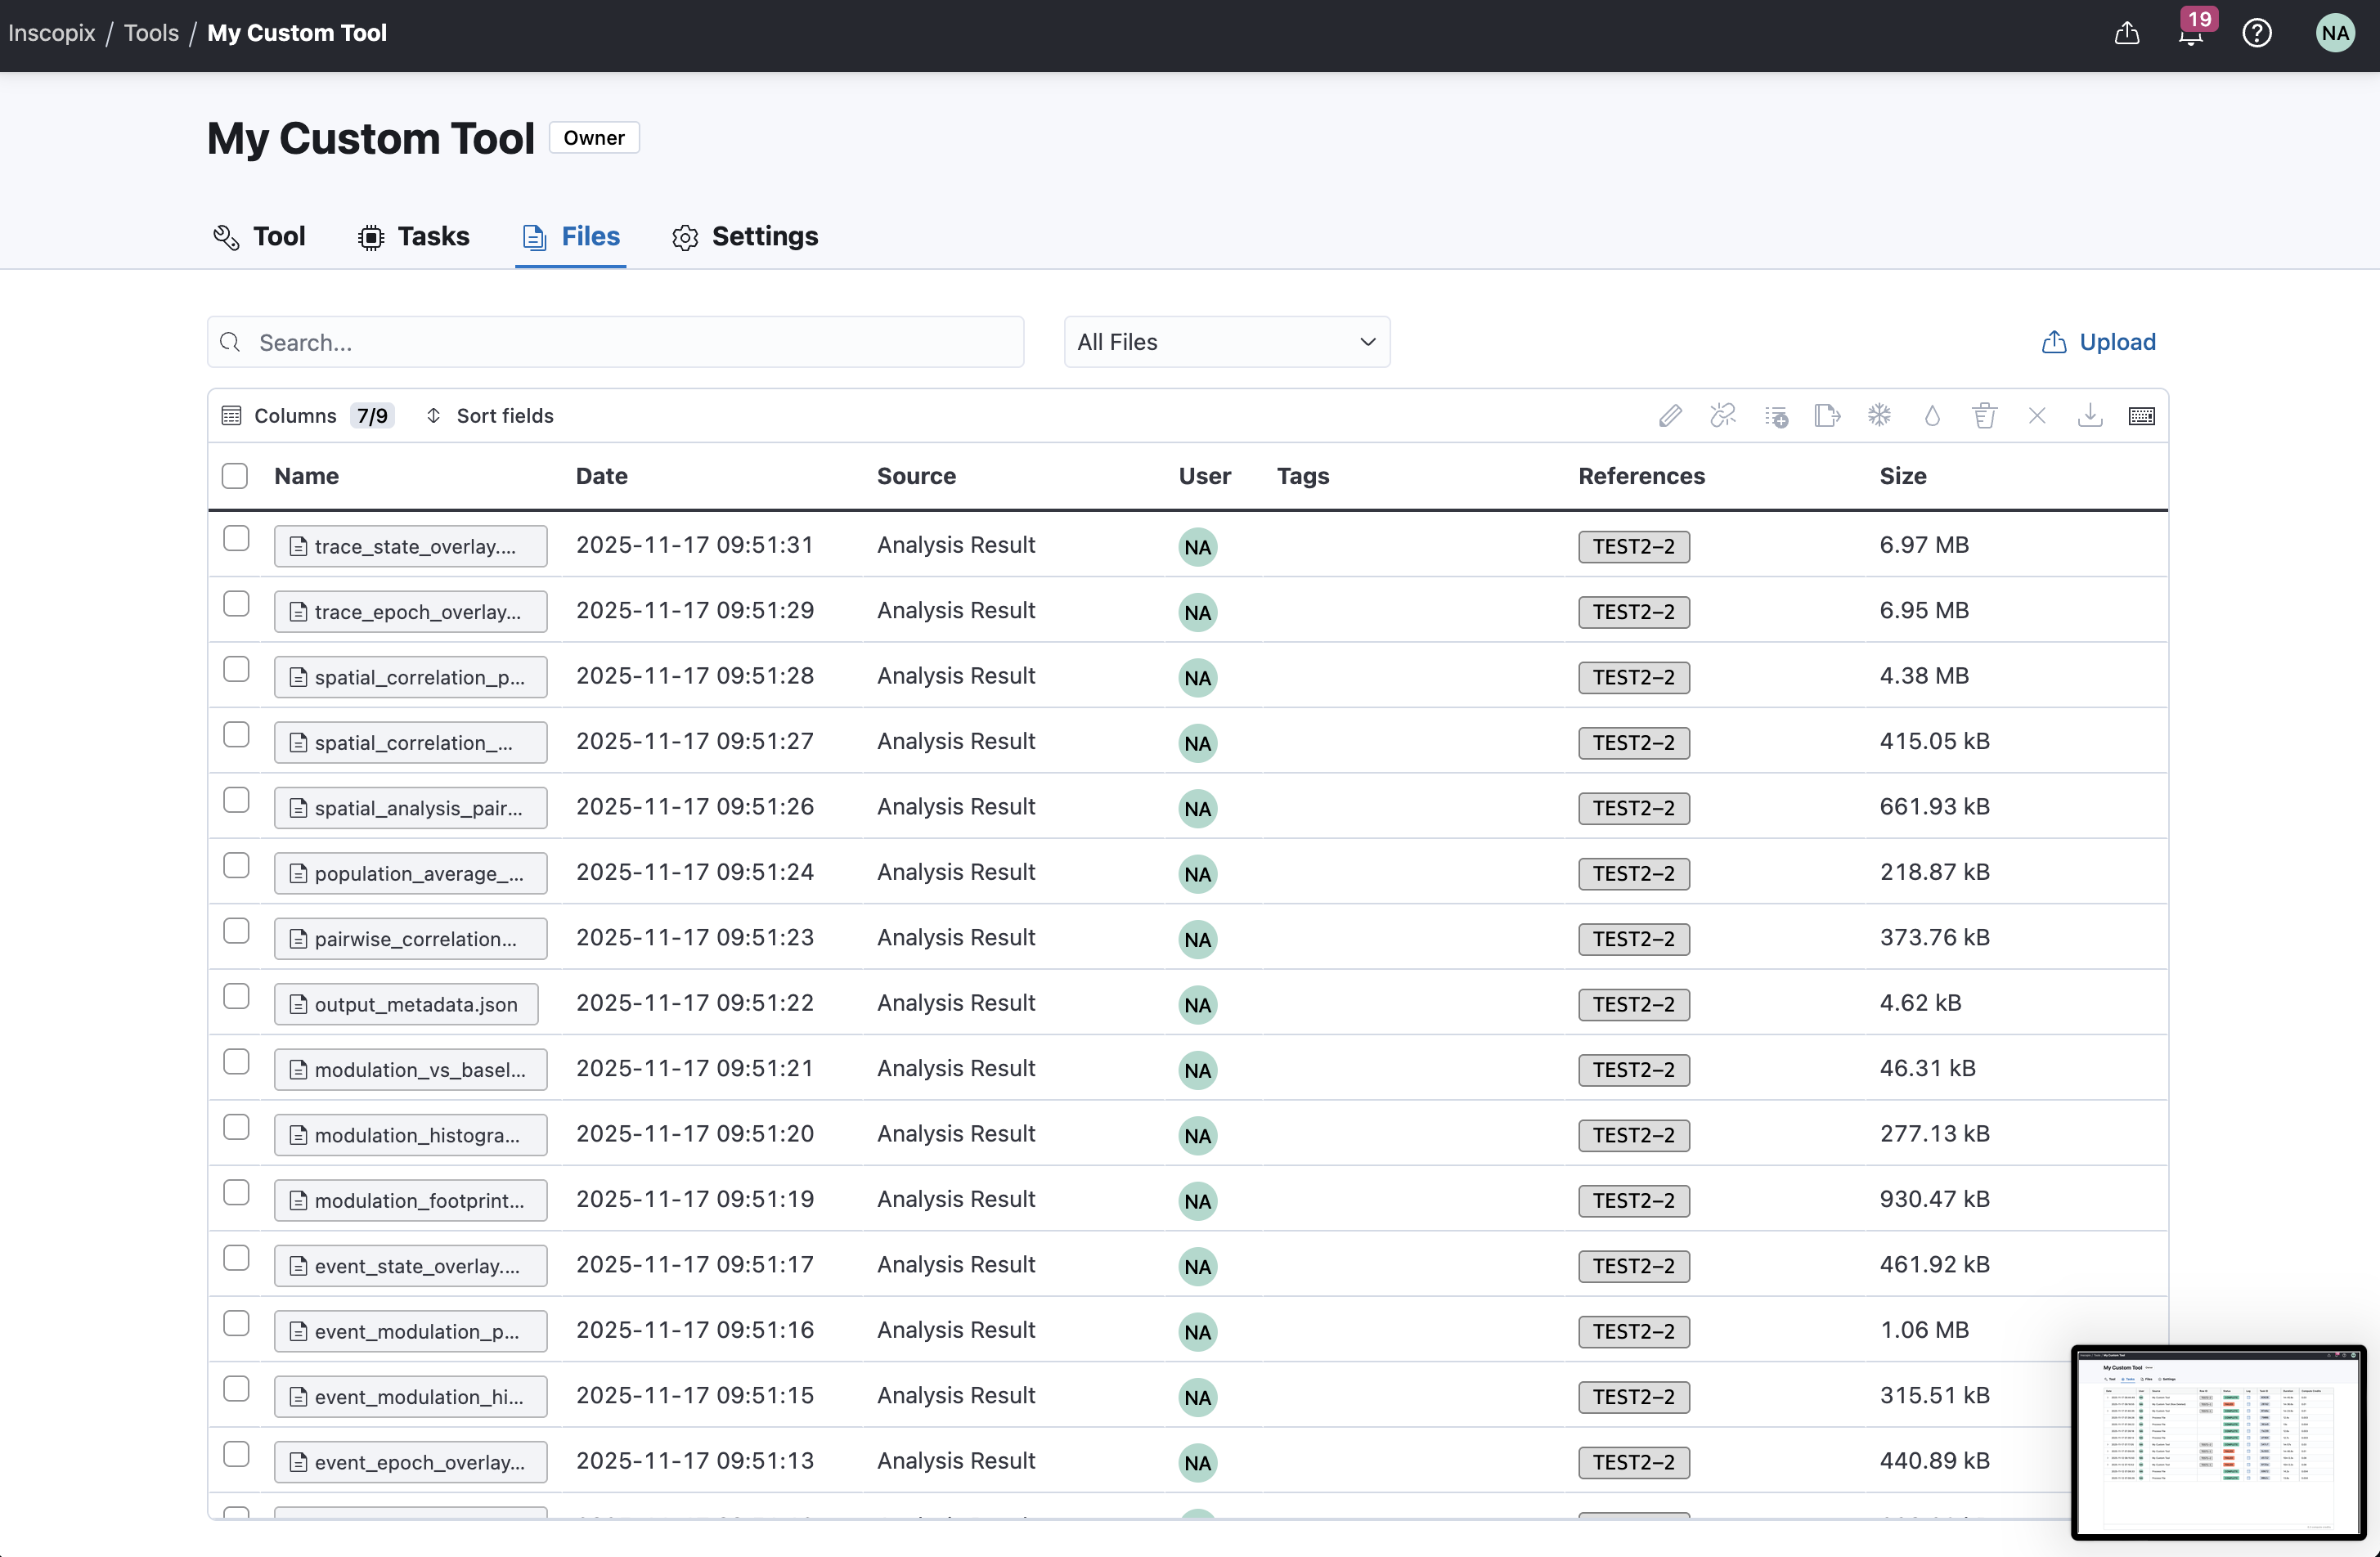
Files
Files can be uploaded to a tool project to be used in the tool publisher test table to test new versions before publishing to your organization. Files can be uploaded in the files tab of the tool project page, but files can also be uploaded directly to the tool publisher test table.
Settings
The settings tab is where you can edit tool project settings including:
| Setting | Description | Editable? |
|---|---|---|
| Name | The name of the tool displayed in IDEAS | Yes |
| Key | A unique identifier for the tool on IDEAS | No |
| Description | A short description of the tool | Yes |
| Docs Link | A link to self-hosted documentation for the tool. For example a link to github docs, or a onedrive link to a pdf file. | Yes |
| Code Link | A link to the source code for the tool. For example a github repo, or a onedrive link with the source code | Yes |
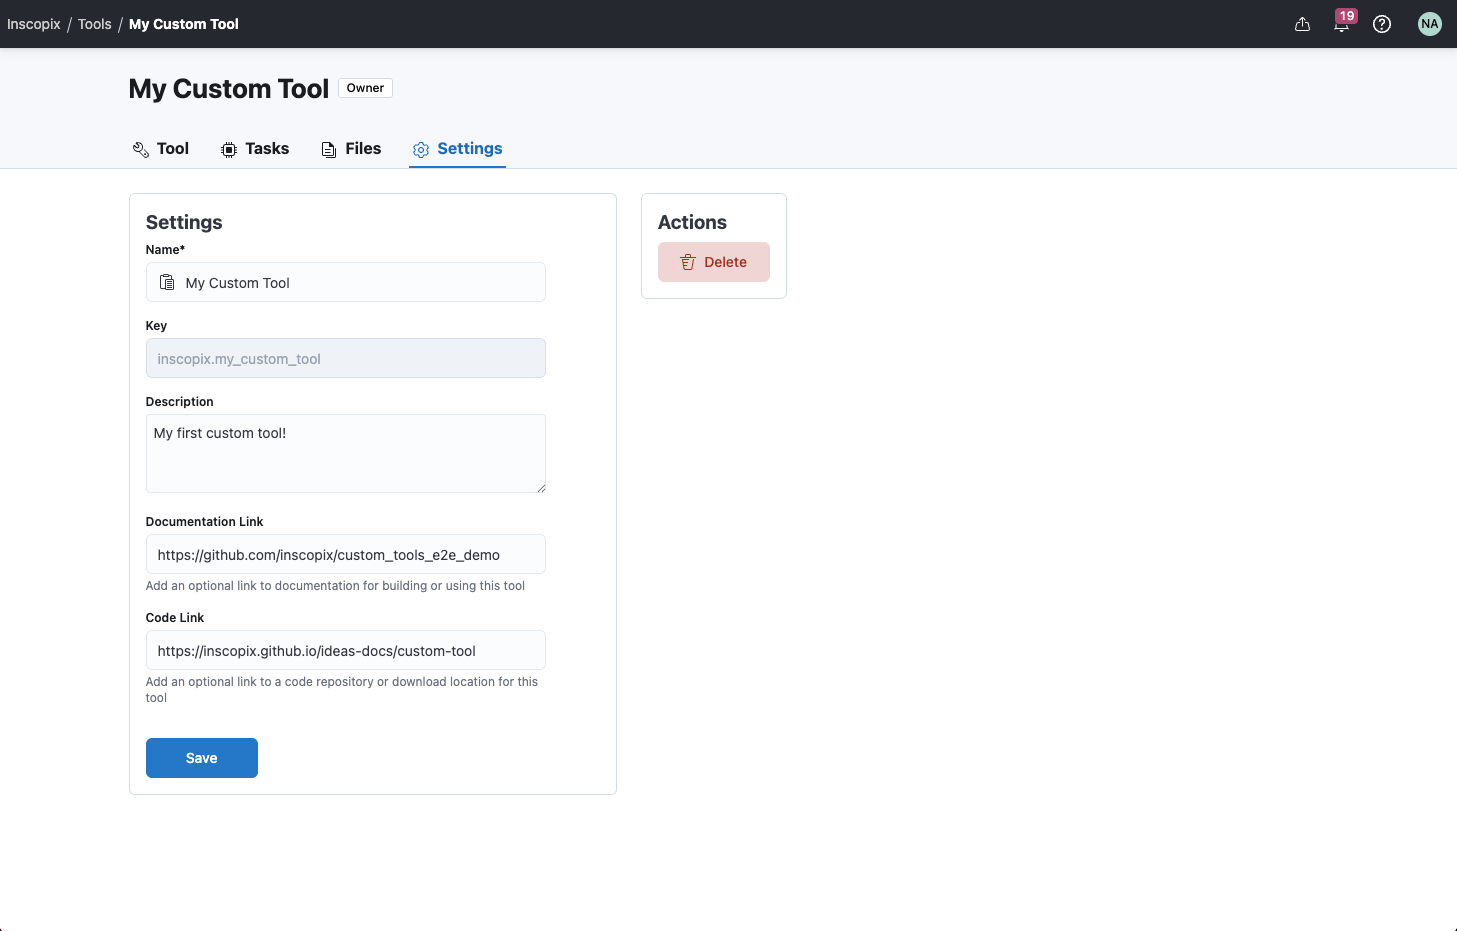
Deletion
A tool can be deleted if it's no longer required by anyone in the tool orgainization. This action is available in the tool settings. When a tool is deleted, it cannot be used in any projects, by any users, across IDEAS in the future. Additionally, any storage for the tool code files is deleted.
Warning
This action cannot be undone. Treat with caution.
Tool Publisher
The tool publisher is an interface that allows you to publish custom tools on IDEAS. It consists of four steps: upload, configure, test, and publish. The publisher allows you to publish new versions your custom tool.
What's a tool version?
A tool version represents the specific version of code and configuration published for a tool. Tool versions help us track reproducibility. If someone encounters an issue with your tool, the version number indicates the specific version of code where the issue was detected. Using the tool publisher, you can create new versions of a tool with fixes and improvements to the code or configuration.
Upload
The first step of the tool publisher is to create and upload your custom code. Custom code needs to be configured and tested locally, and then compressed into a bundle file that can be uploaded to IDEAS. Refer to this guide for more details on the local configuration process.
The publisher shows the CLI commands that you need to execute locally in order to configure, test, and bundle code locally. You can copy each command into a terminal on your computer to follow the local configuration process. After generating a bundle, select the file in the publisher and upload to IDEAS. If the bundle upload successfully, the publisher will automatically move to the next step if it's your first upload for this version.
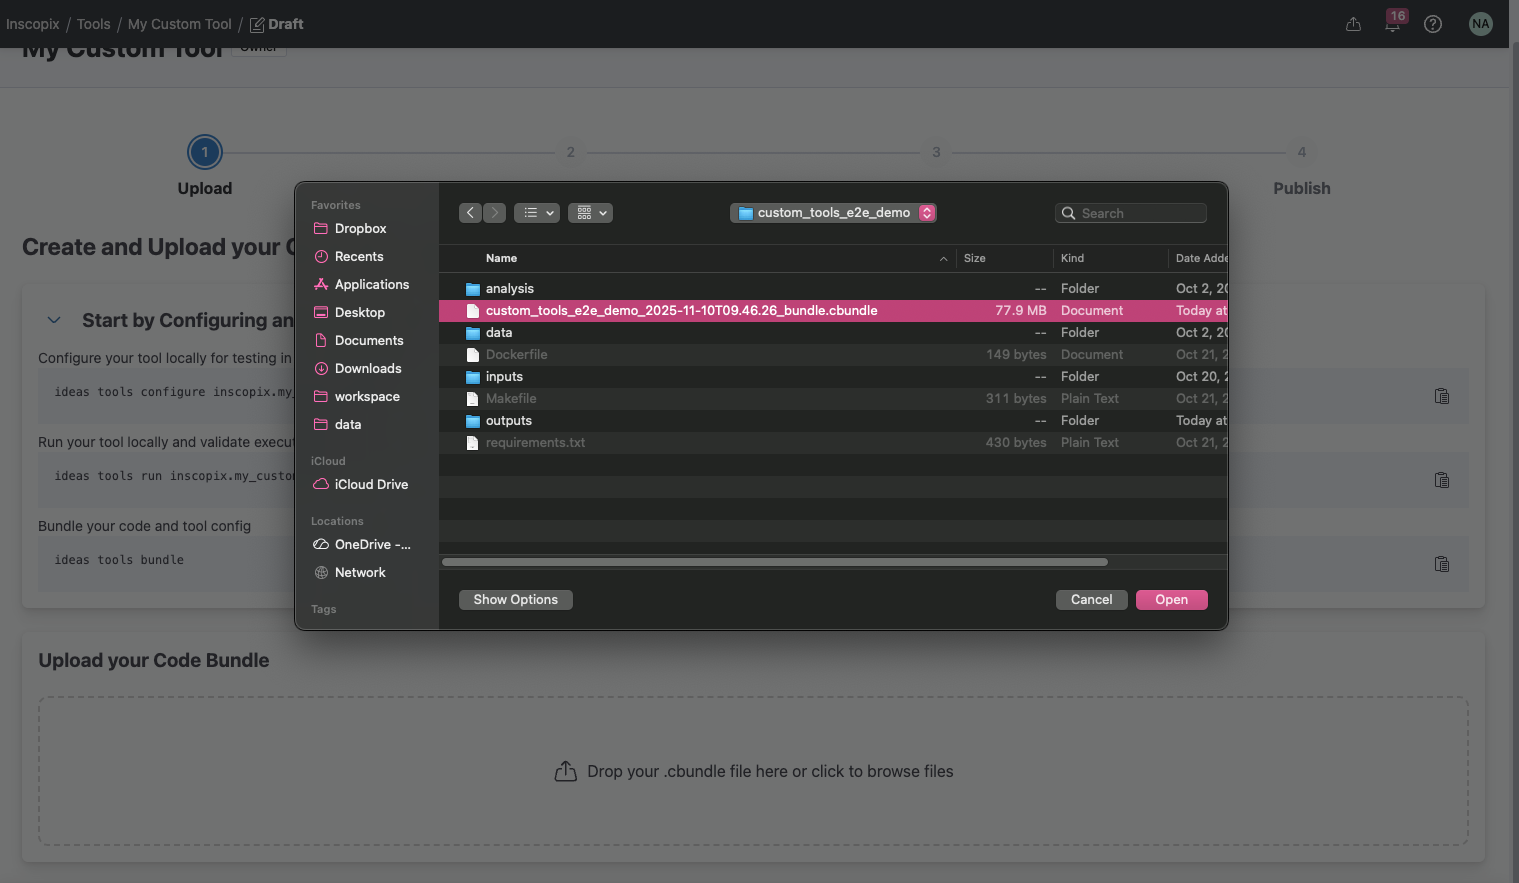
If you've already uploaded a bundle, you will be asked to confirm the change. Any tasks created in the test table will also be reset whenever a new bundle is uploaded.
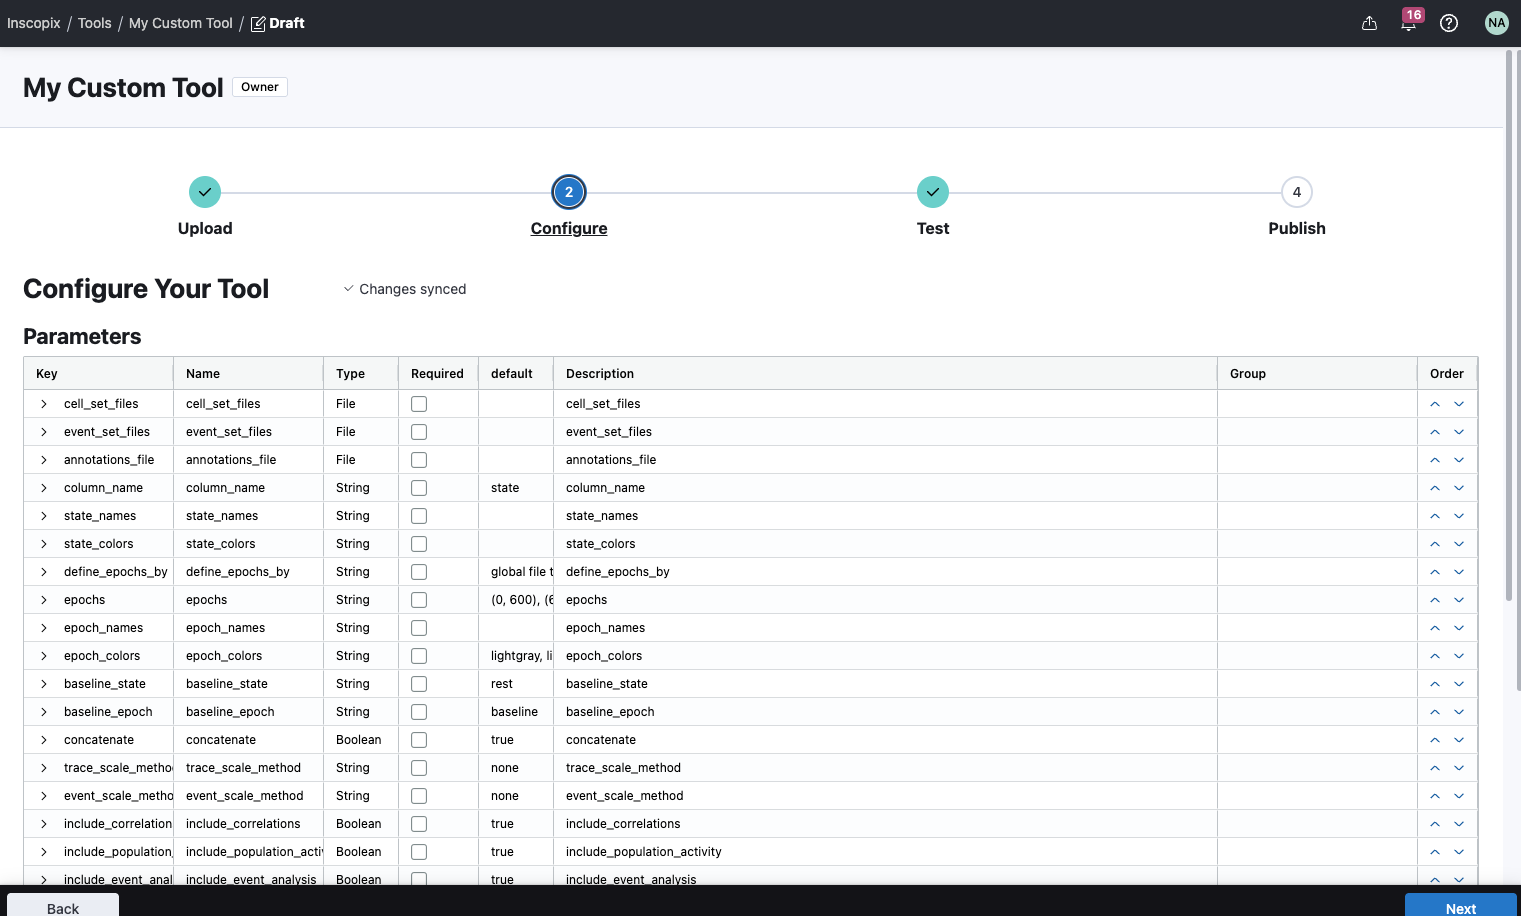
Configure
The second step of the tool publisher is to configure your tool parameters and outputs. Parameters are automatically identified from your tool function. No further configuration is necessary, but you can optionally customize details about the parameters.
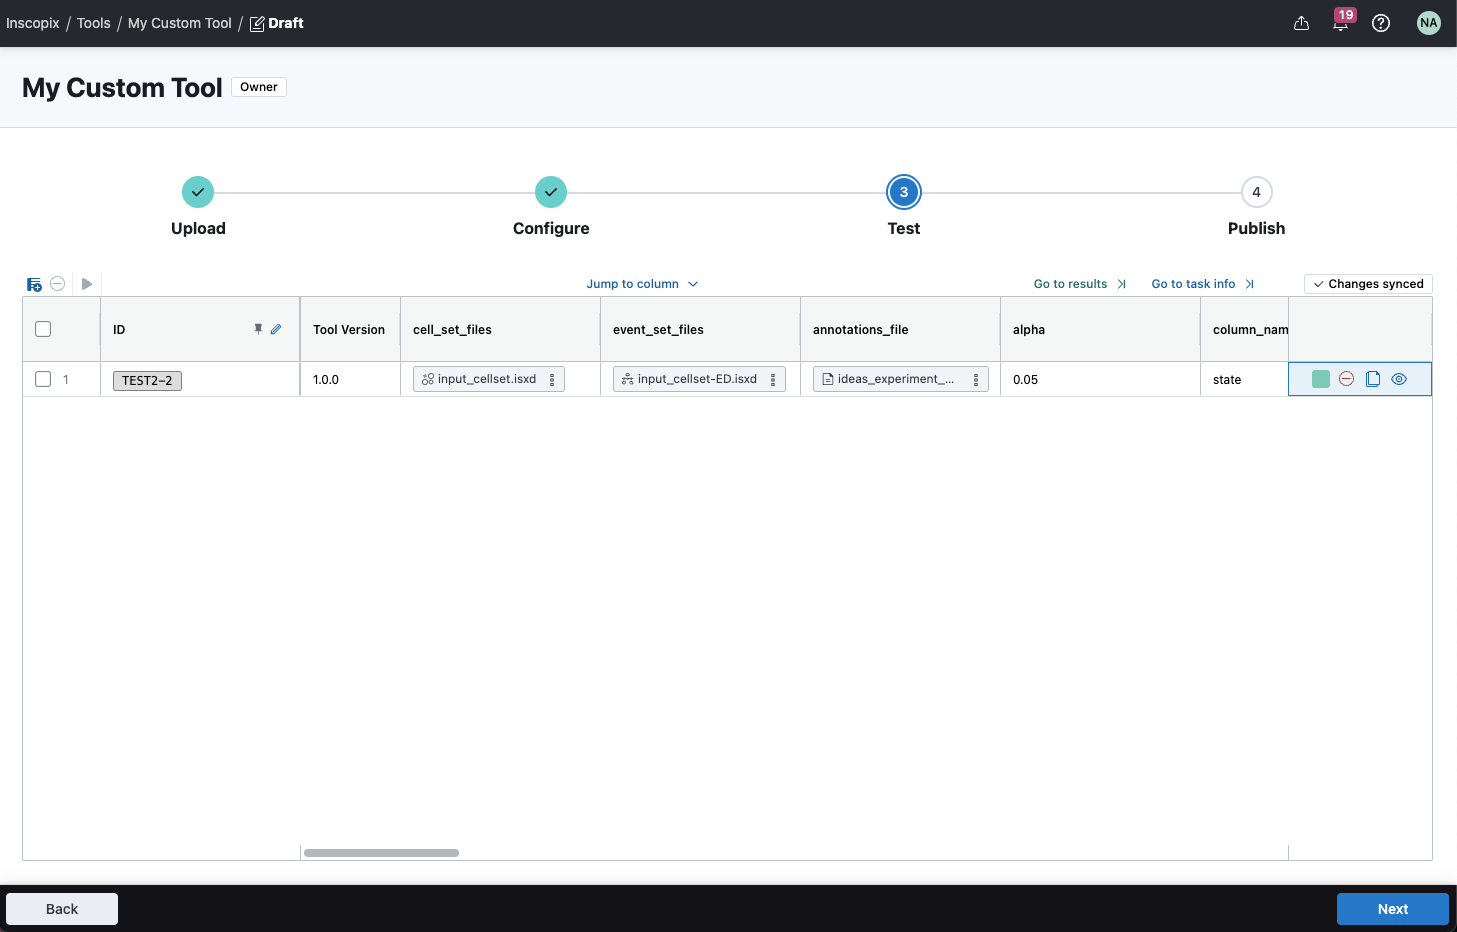
Test
The third step of the publisher is to test your tool. Previously, you tested your tool locally with the CLI, but now you must test your tool as an analysis table. The parameter and output rows from the configure step will map to columns in the tool analysis table. You can upload data to this table and test different use cases to validate how your tool runs in the cloud, before publishing to IDEAS.
Publish
The final step is to publish the tool. Before publishing a tool version, you must describe the changes made in this version so that others in your organization can understand what's changed in this version of the tool. This description is apart of the changelog of the tool, visible in the tool project version table. The changelog also includes an auto-generated record of the changes made to the tool parameters, outputs, and default resources in this tool version.
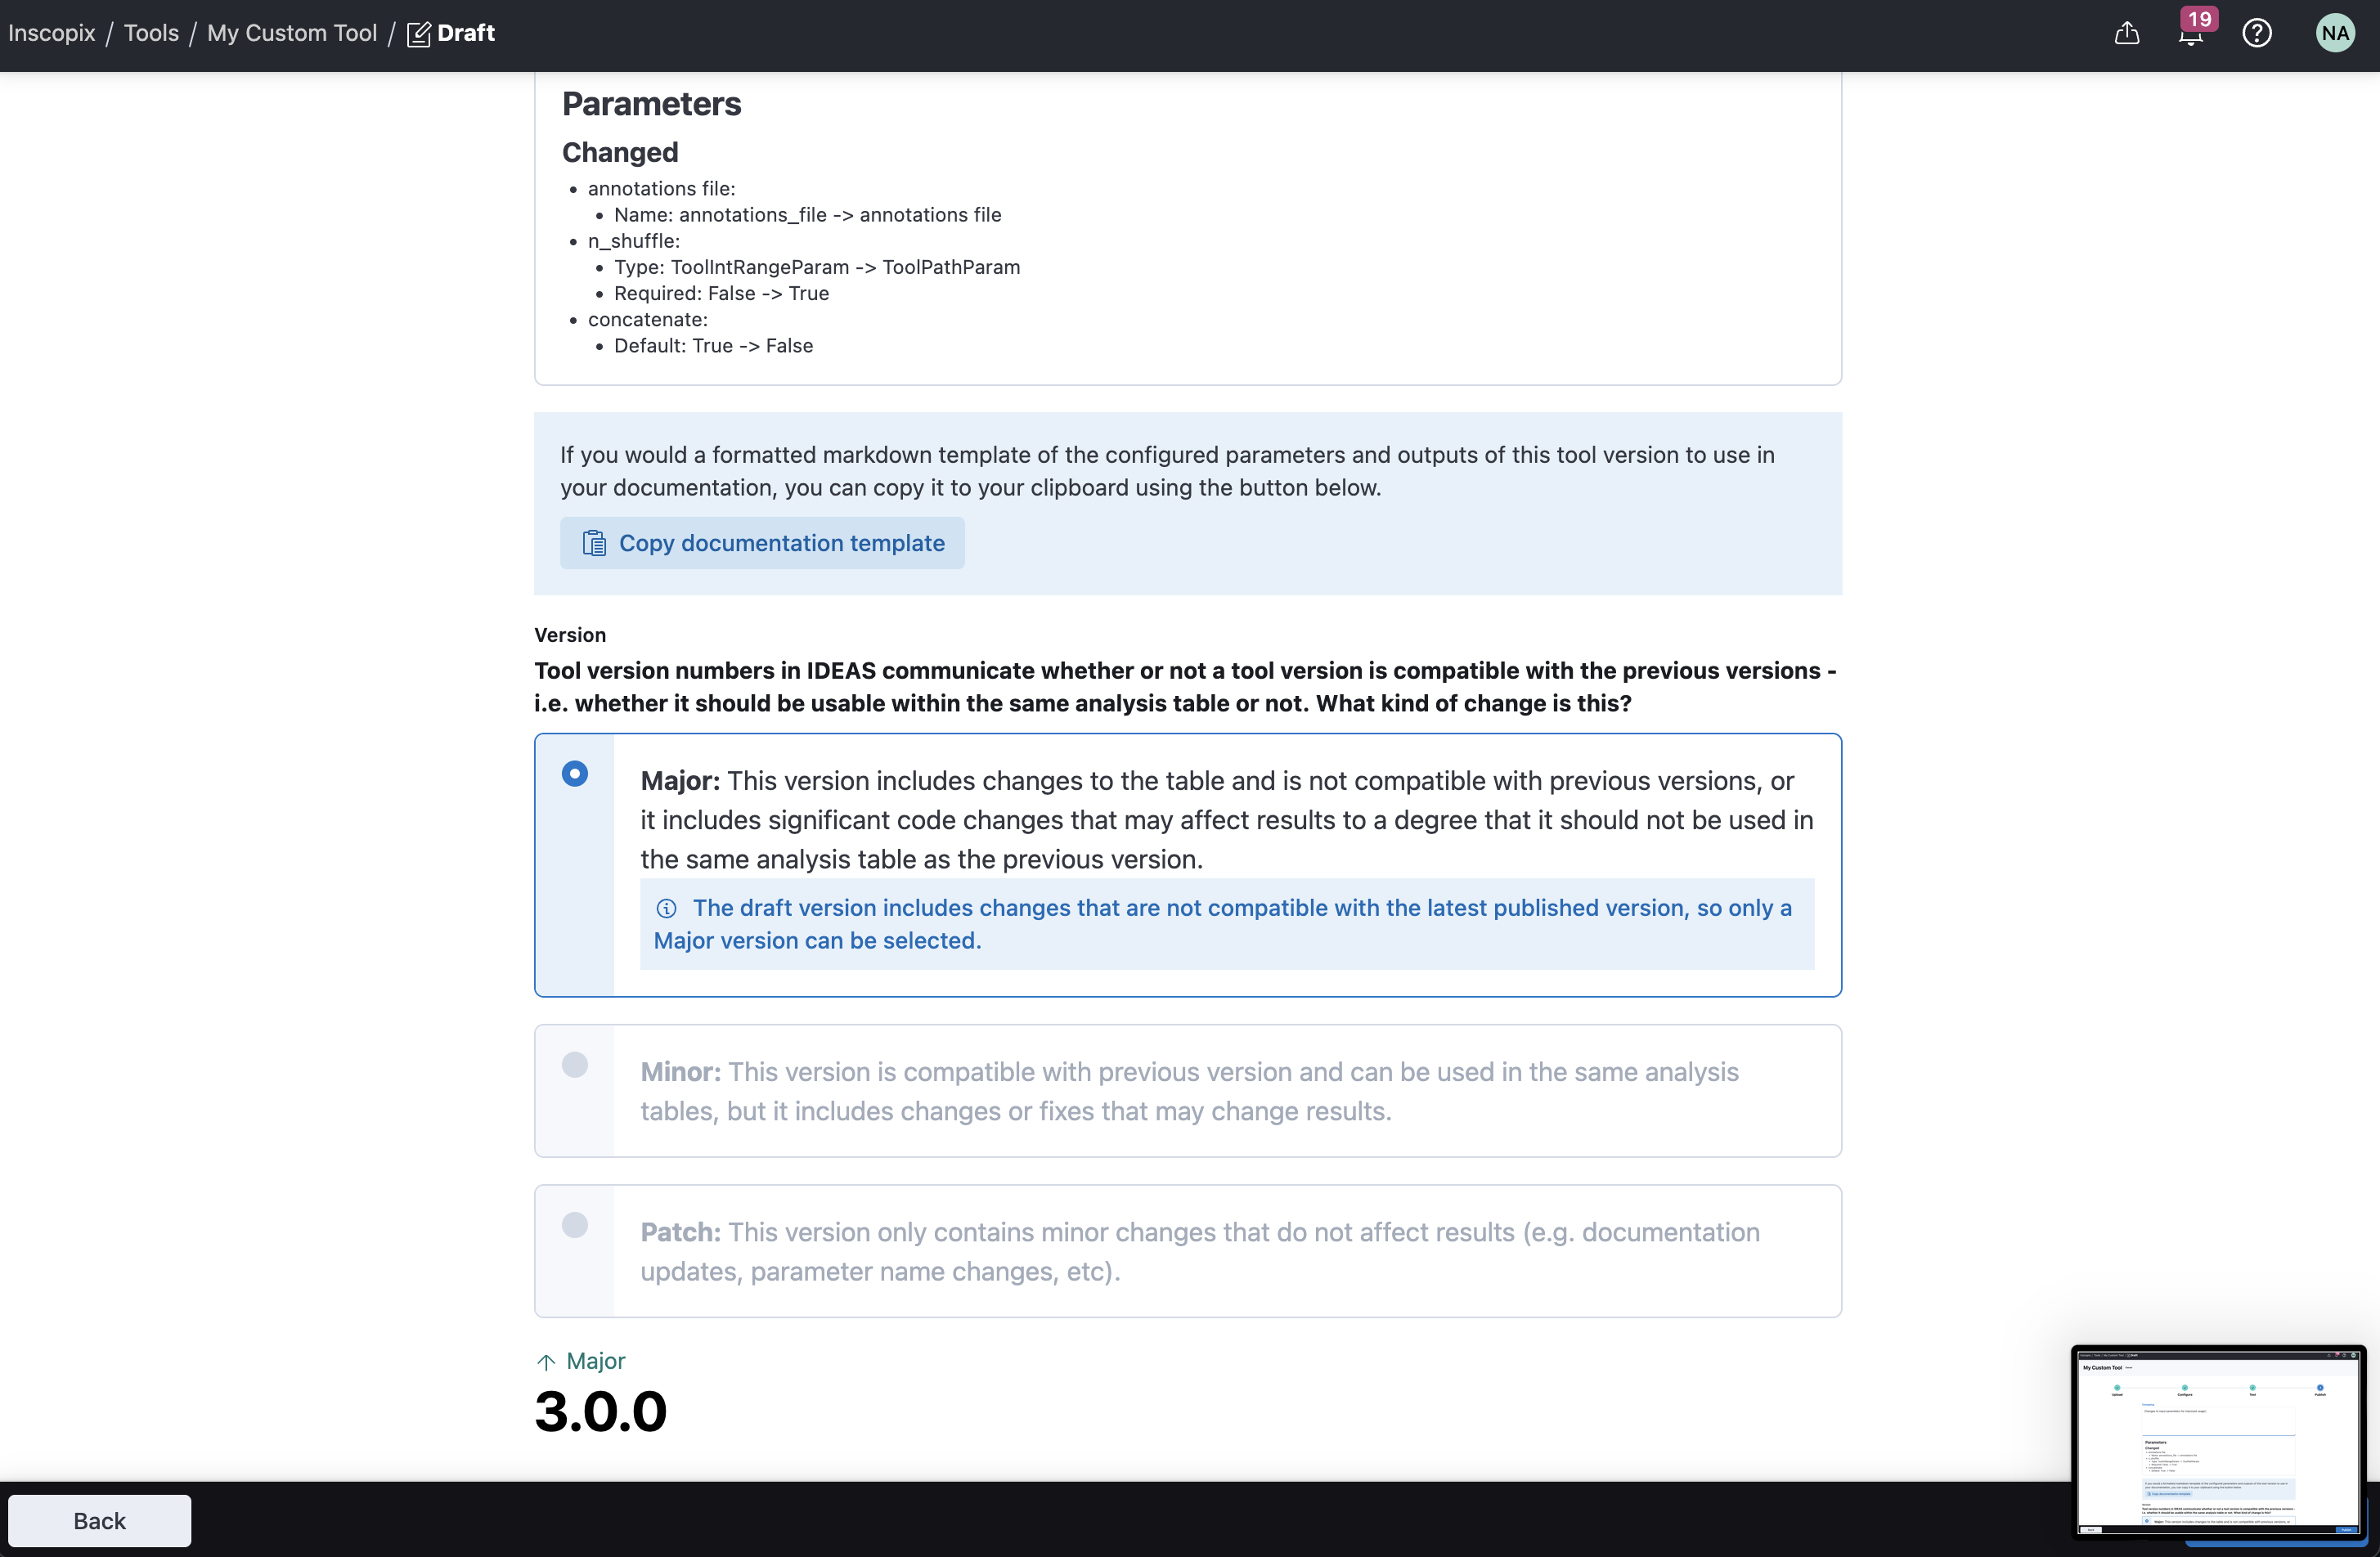
In addition to a changelog, you must also specify a number for this tool version. Tool versions follow sematic versioning.
What is semantic versioning?
Semantic versioning is a standardized way of labelling software releases. This standard is applied for tool versioning in order to improve the experience for tool users.
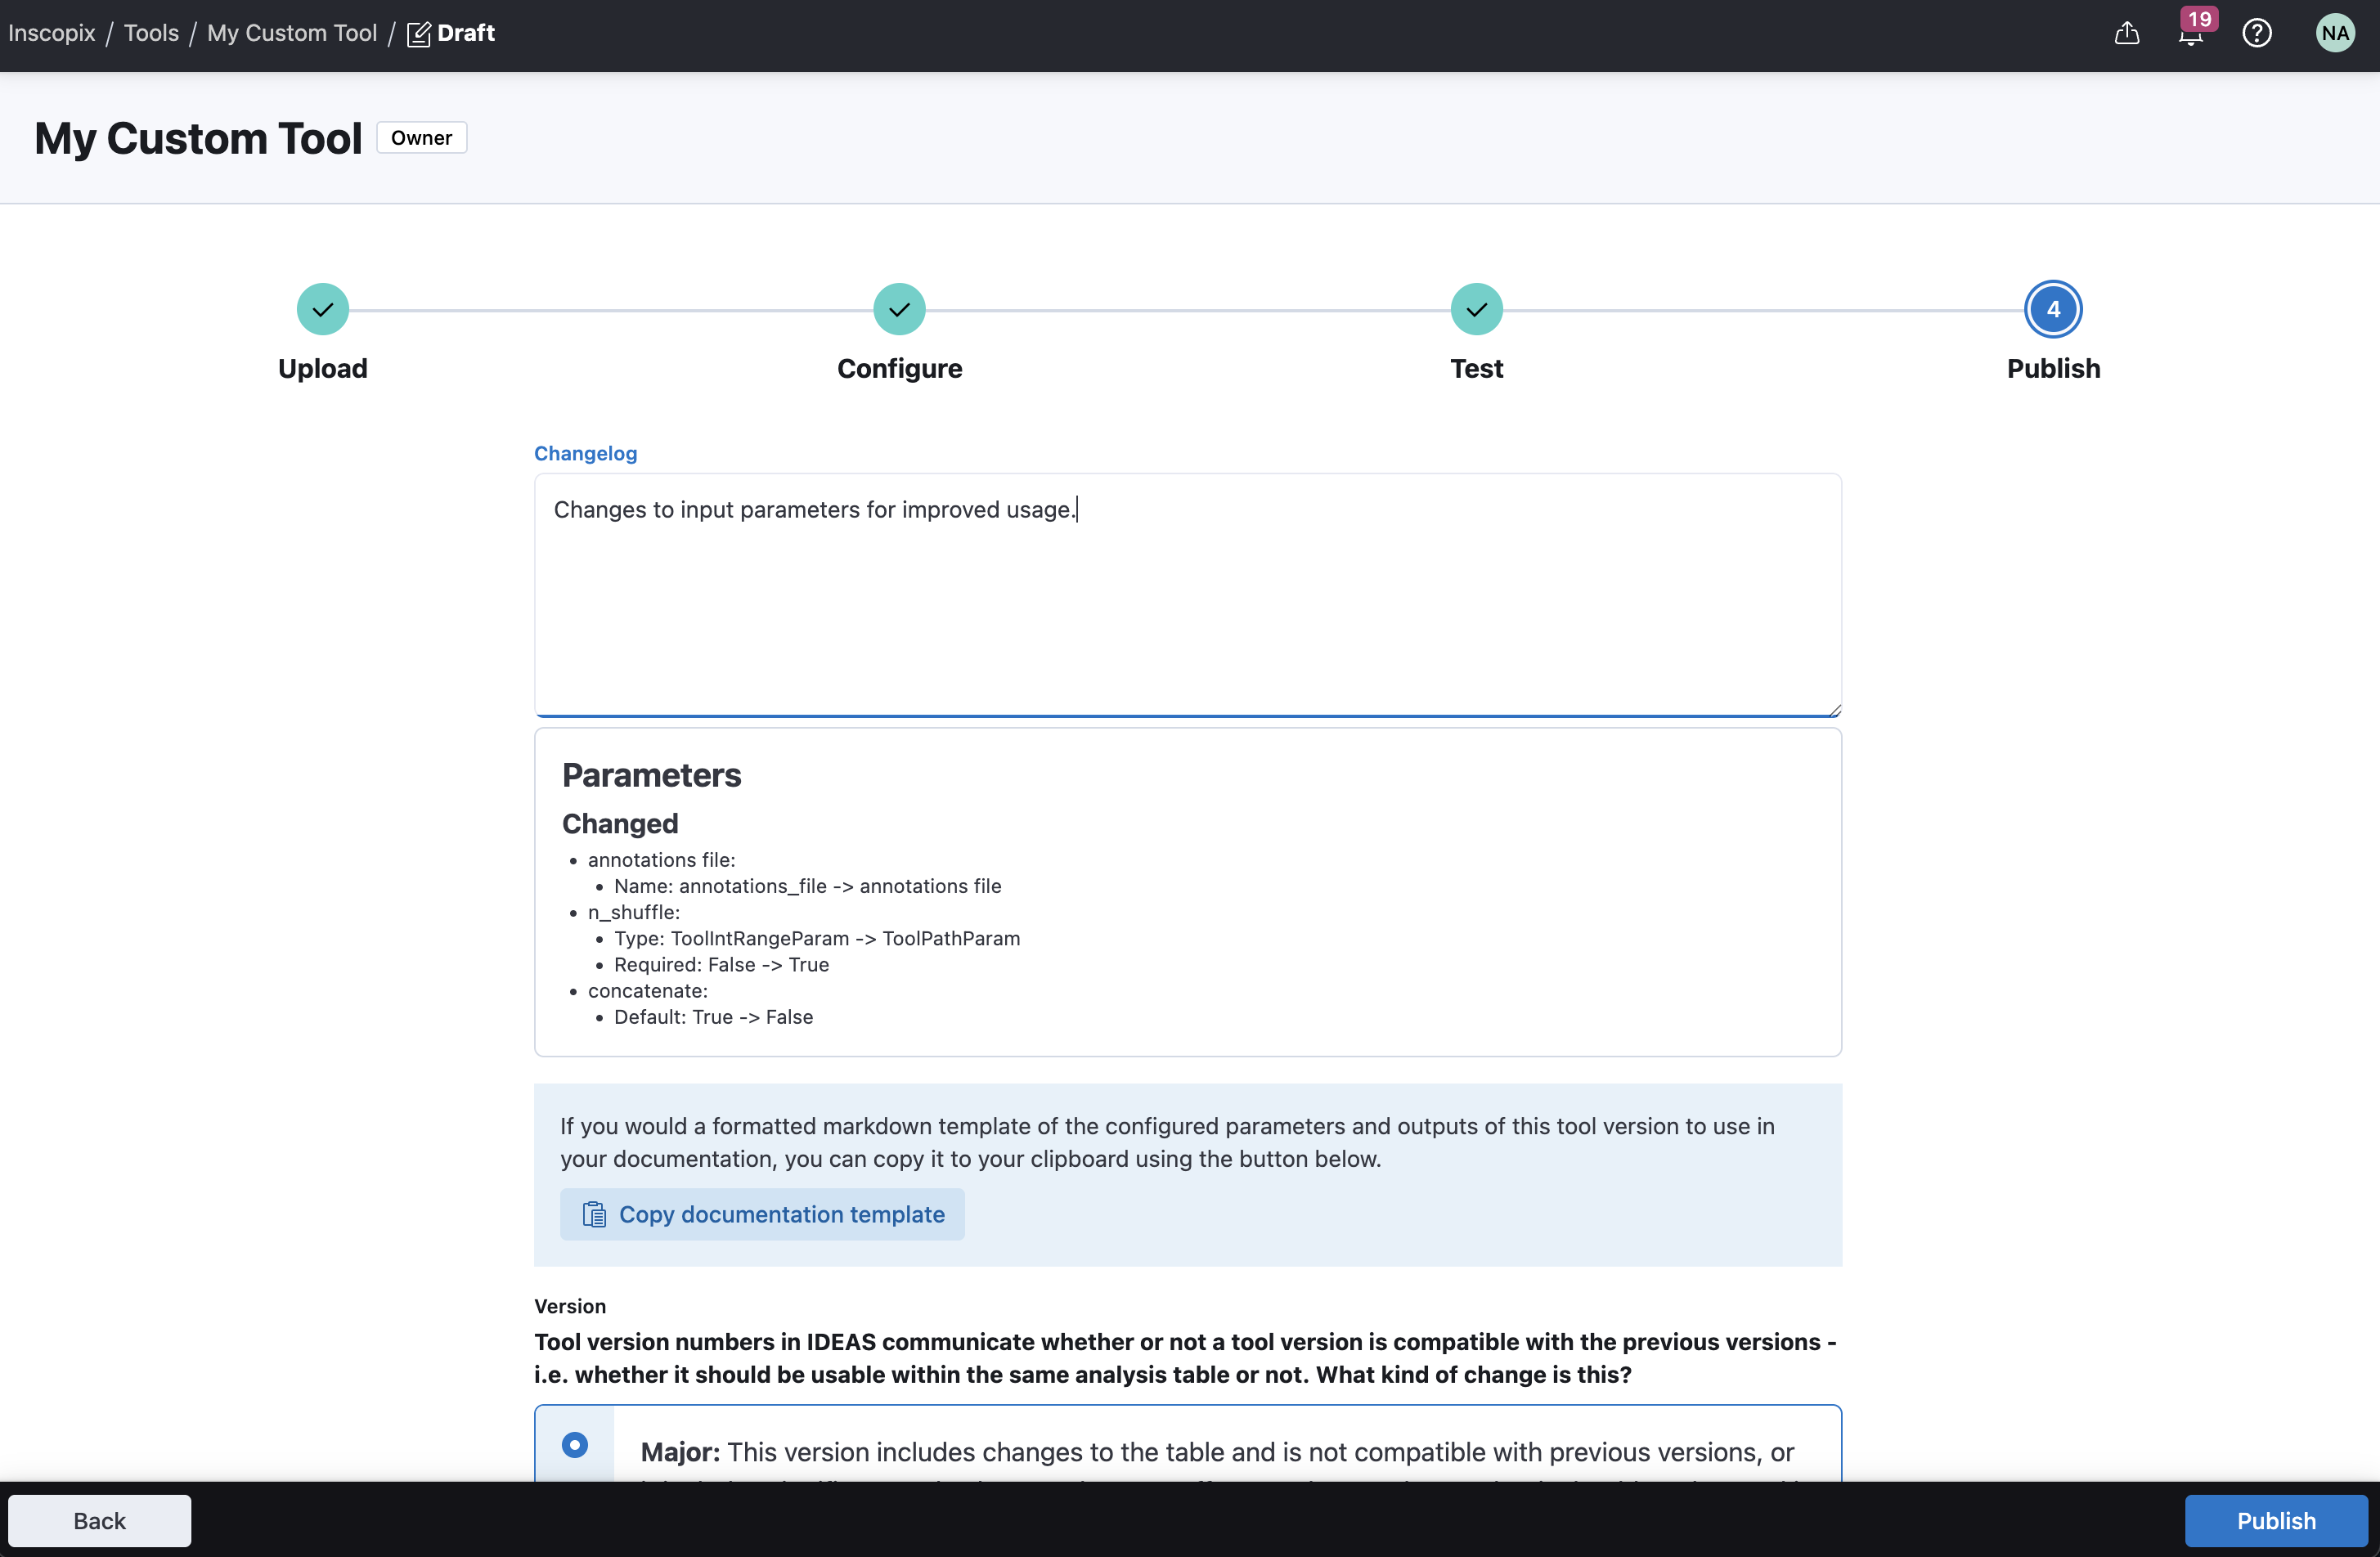
Finally, the publish step also has an option to copy a template for the tool documentation. This template, in markdown format, is a standardized way for documenting tools. This template is used for Inscopix tools, and can be applied for your own custom tools.
Tool Function
A tool is essentially a wrapper around a function. In the context of IDEAS, functions accept input files and other parameters, process the input data and generate output files. Usually the processing that takes place is some kind of scientific analysis, but it could also be another type of operation, like data transformation, conversion, or export.
What's a function?
A function is a piece of reusable code, written in a specific programming language, that performs a specific task.
What programming languages are supported?
IDEAS currently supports functions written in Python.
In order to create a custom tool in IDEAS, you must provide a python function, which is your tool function. A tool function defines the logic of your tool in Python. This function is meant to be an entrypoint to your analysis, which can call other functions, and third party libraries or programs. All IDEAS requires in order to create a custom tool is the entrypoint function which coordinates the tool logic in a reusable way. Functions need to also run in a configured execution environment, i.e., a container, which you can read more about here.
Tool Parameters
Most programming languages support functions as a way to reuse and package code. Within IDEAS, function parameters map to a tool parameter. When you configure your tool locally, IDEAS CLI introspects your tool function, automatically detecting the parameters, and mapping to compatible tool parameters in IDEAS.
What's a function signature?
A function signature is the declaration of a function that includes its name, and depending on the programming language, the arguments and return type.
What's a function parameter?
A function parameter is a named variable listed in the function signature, which represents an input value that is passed to the function and can be used within its scope for processing. Function parameters are used to control the behavior of the function.
What's a tool parameter?
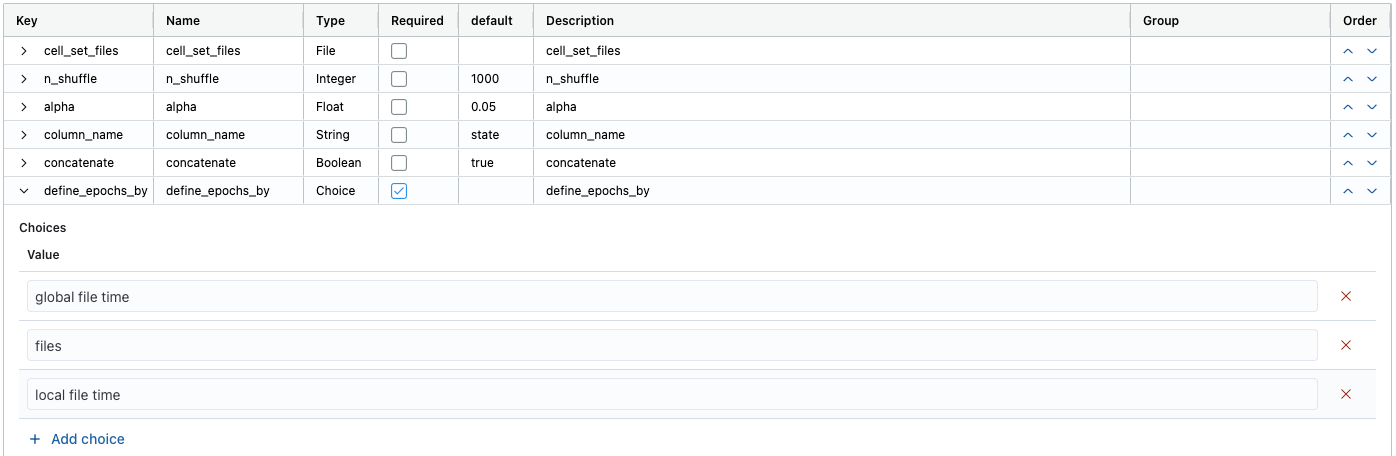
A tool parameter is an input for an IDEAS tool, represented as a column in the tool analysis table. Tool parameters in IDEAS are similar to function parameters. Tool parameters have a name, and identifier, referred to as a key, as well as a few additional properties, outline in the section below.
When IDEAS CLI introspects your tool function and automatically identifies all of the parameters, it tries to infer as many details as possible about the function parameter, in order to initialize the corresponding tool parameter. All tool parameters have the following properties that can be customized in the configure step of the tool publisher.
| Property | Description | Supported in Python? |
|---|---|---|
| Key | The identifier for the tool parameter | Corresponds to the name of the python function parameter. This is how IDEAS maps function parameters to tool parameters |
| Name | A pretty name for the tool parameter, to display in the tool analysis table | No |
| Type | The type of the tool parameter, which supports different types of input values. Read more about tool parameters types here | Corresponds to the python type annotation for the parameter in the function signature, if specified, or the type of the default value, if specified. Refer to this section for a list of supported python types for tool functions. |
| Default | The default value for tool parameter in the tool analysis table | Corresponds to the default value for a parameter in the function signature |
| Required | Indicates whether a value for the parameter is required in order to run the tool. | No |
| Description | A short description of the parameter, which appears as a tool tip for the parameter in the tool analysis table | No |
Tool Parameter Types
There are several different types of tool parameters, which support different input value types. The following table summarizes the types of tool parameters supported in IDEAS.
| Type | Description |
|---|---|
| File | One or more input files from an IDEAS project |
| Integer | An integer number |
| Float | A floating point number |
| String | A string |
| Boolean | A boolean, either yes or no, true or false, etc. |
| Choice | A string option selected from a list of choices. |
IDEAS CLI tries to automatically identify the tool parameter types from your tool function, however the parameter type can be manually specified in the configure step of the publisher.

The following sections describe each tool parameter type in more detail.
File Parameter
The file parameter type is for any parameter representing an input file. Configuring a parameter as this type allows you to select files from your IDEAS project to use in a tool. IDEAS takes care of making the selected file from the user's project available in the cloud where the tool runs.

File parameters support the following customizations.
File Formats
A list of file formats to use for filtering compatible files for this parameter. A file format represents the standard for how data is stored in a file. File formats are often identified by the extension of the file, which is the convention used in IDEAS. This list will be used as a filter when selecting a data file from a project in the tool analysis table.

File Tags
A list of tags to use for filtering compatible files to select from a project. Similar to file formats, this list will be used as a filter when selecting a data file from a project in the tool analysis table. Tags are generated for files when generated from other custom tools. See adding tags to output data in custom tools.

Integer Parameter
The integer parameter type is for a function argument which represents a whole number, negative or positive.

Min, Max
An inclusive range can be defined for integer parameters, which restricts values between a min and/or max.
Float Parameter
The float parameter type is for a function argument which represents a decimal number, negative or positive.

Min, Max
An inclusive range can be defined for float parameters, which restricts values from a min and/or max.
String Parameter
A string parameter type is for a function argument which represents any string input. This parameter type does not have any additional configurations.

Boolean Parameter
A boolean parameter type is for a function argument which represents any boolean input (i.e., true or false, yes or no). This parameter type does not have any additional configurations.

Choice Parameter
A choice parameter type is for a function parameter which represents a string input selected from a defined list of choices. This parameter type is helpful for defining options that can be chosen from to run your custom tool.
Python Types to Tool Parameter Types
IDEAS currently supports the following python types for the tool function. When writing your tool function, ensure all parameters map to one of the following supported python types.
| Python Type | IDEAS Parameter Type |
|---|---|
str, Optional[str] |
String |
int, Optional[int] |
Integer |
float, Optional[float] |
Float |
bool, Optional[bool] |
Boolean |
IdeasFile, Optional[IdeasFile] |
File |
List[IdeasFile], Optional[List[IdeasFile]] |
File |
IdeasFile
This python type is from the ideas.types module from the ideas Python API
What if my function has parameters with unsupported types
You may find yourself in a situation where you have an existing function that accept parameters with unsupported python types. For example, maybe your function accept a pandas dataframe representing cell traces. In order to use this function on IDEAS you will need to write a wrapper function which converts a parameter with a supported python type, to your custom type. For example, your function wrapper could accept an isxd file path and read that into a pandas dataframe which is passed to your original function.
Tool Outputs
Aside from tool parameters for inputs, a tool also has outputs.
What are tool outputs?
A tool output is a set of result files generated by a tool based on some input values. Tool outputs are represented as columns in an analysis table where result files can be viewed.
Tool outputs can contain one or more results files. Each result file is available on the cloud and can be downloaded to your local computer. Each result file can also have additional output data, including previews, metadata, and tags.
Output Directory
When IDEAS runs your tool, it creates an empty, output directory, which is set to the current working directory. Any output files written to the current working directory will automatically be identified as result files, which will be made available in the output column of the tool. So all you need to do in your tool function is ensure any result files are written to the current working directory, and IDEAS takes care of the rest!
Output Data
Output data is additional data associated with result files generated by a tool. This additional data is displayed in IDEAS, and helps to provide contextual information about a result from a quick glance. You can understand what's in a result file, just by looking at it's previews, or metadata, or tags, without actually having to download the result file from the cloud.
Use ideas-python
To generate output data, you need to use the IDEAS Python API. Refer to this guide on how to use the Python API to generate output data in your tool function.
Previews
Previews are figures that describe data stored in a result file. These can include figure plots, images, or movies. Previews are meant to be small files, which accompany a result file, and can be used to provide a quick summary or impression of the results in a file.
Maximum Preview File Size
The maximum preview file size currently supported in 50 MiB. If your preview file is greater than 50 MiB, IDEAS will ignore the file and not save it to your cloud storage.
The following file formats (i.e., extensions) are supported for rendering previews:
| File Format | Comments |
|---|---|
png |
Remdered as an image |
svg |
Remdered as an image |
mp4 |
Remdered in an HTML5 video player, which supports H.264 or H.2645 codecs. |
html |
Rendered as a webpage |
json |
Rendered as a code block |
Refer to the IDEAS Python API for more info on how to register previews to output files in a tool function.
Metadata
Metadata is any piece of key, value data which describes a result file in some way. Metadata can range from anything like the date the originating data was generated, or the subject id, experimental condition, behavioral states, statistics, etc.
Metadata consists of the following three properties:
| Property | Description |
|---|---|
| Key | A unique identifier for a piece of metadata that can be used to connect metadata across different files and tables |
| Name | A display friendly name for the metadata |
| Value | The value of the metadata |
The following json types are supported for metadata values:
stringbooleannumberarray[string]
Refer to the IDEAS Python API for more info on how to register metadata to output files in a tool function.
Tags
Tags are labels which describe a result file.
Tags are helpful for assigning categorical labels for result files, which can be used to filter file inputs in downstream tools.
For example, a tag can describe the type of data in a result file, like movie, traces, footprints, etc.
Or tags can describe other attributes of a result file, like experimental conditions, behavioral states, result classification, etc.
Tags can be useful for filtering inputs in downstream tools. For example, if the outputs of one custom tool need to be used downstream in another custom tool, a unique tag can be registered with the result files in the tool code, and the downstream can specify this unique tag in the configuration of its input parameters.
Refer to the IDEAS Python API for more info on how to register tags to output files in a tool function.
Output Columns
In addition to being able to assign output data to result files, you can group result files into different output columns.
By default, a single output column is created for a custom tool, which looks for any output files generated by the tool and places all detected files in a one column. You can customize the default setting by creating multiple output columns, representing different groups of result files.
Each output column identifies output files using a file pattern. The file pattern matches to files in the output directory. If a file matches a file pattern it's assigned to the corresponding output column.
What's a file pattern?
A file pattern is a string of characters and wildcard symbols used to match a set of files or directories based on their names. IDEAS uses glob file patterns for matching result files. Read more about glob and test out different file patterns here
File patterns for output columns are relative to the output directory
The output directory is managed by IDEAS when your tool runs. File patterns for output columns are defined relative to the output directory
Absolute file patterns are not supported.
The default file pattern is **/*, for a single output column.
This file pattern means:
**is used to match zero or more directories and subdirectories in the output directory/*is used to match zero or more files in any of the matching directories
Combining these two pieces of the file pattern, this matches any file recursively in the output directory.
If for example, you want one output column with all files ending .csv in the output directory, the file pattern could be set to *.csv.
However, this file pattern would not match csv files in subdirectories of the output directory.
Instead, the file pattern could be set to **/*.csv, which will match any csv file in any subdirectory of the output directory.
Multiple file patterns
One output columns supports multiple file patterns, for situations where you need to match files across different conditions.
File patterns must match previews for result files
File patterns for an output column not only need to match the result, or output file, but also any preview files registered with the output file in the output data
Use directory structure for your file patterns
The easiest way to use file patterns for output columns is to create a subdirectory in the output directory for each output column.
And place files belonging to a particular output column in the corresponding subdirectory.
Then your file pattern should be something like: <output_column1>/**/*, <output_column2>/**/*, etc, for each output column
The file pattern for each output column matches any files recursively in the corresponding subdirectory.